
Have you ever wondered how real-time apps like chat apps and online games are built? If you’ve never built one before, read this tutorial as I’m going to show you how to build a simple one using socket.io.
What are we going to build?
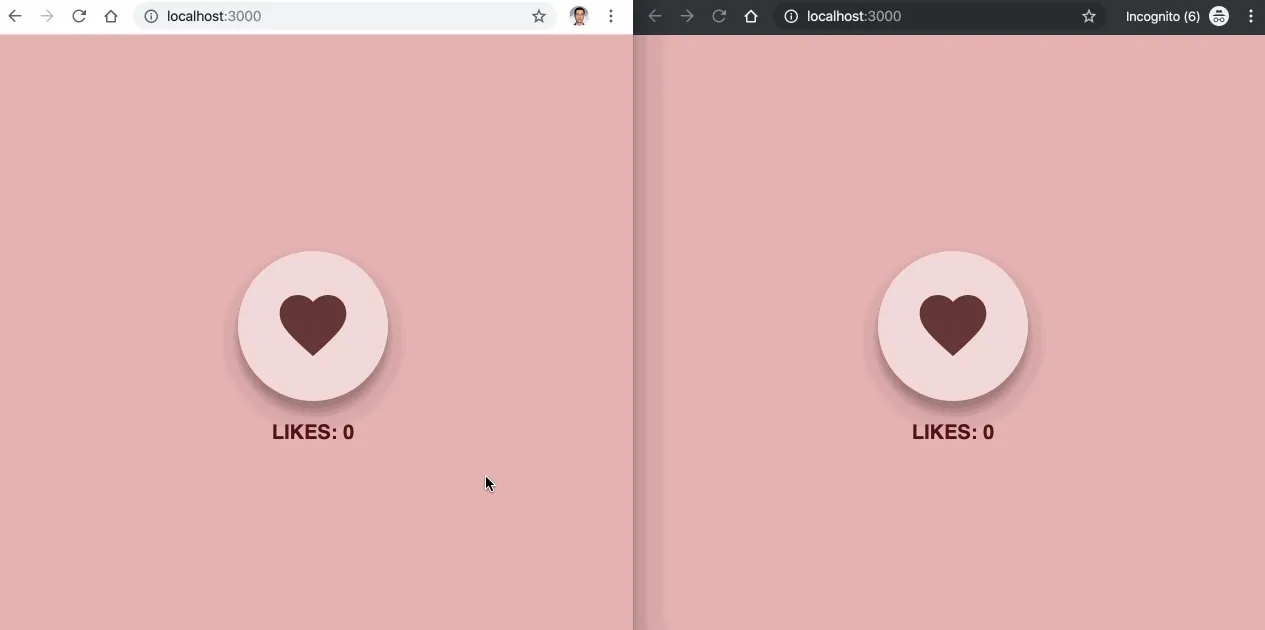
It’s a simple app with one button and a label below it. The label displays “Likes: X” (where x is the current number of likes). When the user clicks on the button, the number of likes increases by one.
We’re going to make it real time by showing users on the app how the number of likes increases as other users are clicking on the button. So you don’t need to reload the page to see the latest value.
Here’s how the app would look like:
You can get the source code of this project on GitHub.
Creating a new project
In a new folder, add package.json using npm init -y, and then install these three packages:
npm install express ejs socket.io
We’ll use ejs as the templating engine, and socket.io for making our app a real-time app.
Displaying a hello world page
As mentioned above, we’ll use ejs for rendering our views. So create index.ejs and add the following:
<!DOCTYPE html>
<html lang="en">
  <head>
    <meta charset="UTF-8" />
    <title>Realtime like app</title>
  </head>
  <body>
    Hello World!
  </body>
</html>
Now let’s create our node server and serve the above file as the homepage.
So create index.js and add this:
const app = require('express')()
const path = require('path')

app.engine('html', require('ejs').renderFile)
app.set('view engine', 'html')

app.get('/', (req, res) => {
  res.render(path.join(__dirname + '/index.ejs'), null, (err, html) => {
    res.send(html)
  })
})

app.listen(3000, () => console.log('the app is running on localhost:3000'))
So we created a new server that runs on port 3000. When the user hits http://localhost:3000/ in the browser, we’ll render index.ejs and display it.
If you run the app using node index.js (or using nodemon if you want the app to restart automatically on changes) and open http://localhost:3000/, you should see “Hello World!” displayed.
Adding style.css
This isn’t a CSS tutorial, so let’s quickly add style.css in the root directory and fill it with this:
body {
  background: hsl(0, 50%, 80%);
  display: flex;
  justify-content: center;
  align-items: center;
  height: 100vh;
  margin: 0;
  padding: 0;
}

button {
  background: hsl(0, 50%, 90%);
  border: none;
  border-radius: 50%;
  display: flex;
  align-items: center;
  justify-content: center;
  width: 150px;
  height: 150px;
  cursor: pointer;
  outline: none;
  box-shadow: 0 14px 28px hsla(0, 50%, 10%, 25%), 0 10px 10px hsla(0, 50%, 10%, 22%);
  transition: all 0.3s cubic-bezier(0.25, 0.8, 0.25, 1);
}

button:hover {
  box-shadow: 0 1px 3px hsla(0, 50%, 10%, 12%), 0 1px 2px hsla(0, 50%, 10%, 24%);
}

button:active {
  box-shadow: none;
}

svg path {
  fill: hsl(0, 30%, 30%);
}

.main {
  display: flex;
  flex-direction: column;
  justify-content: center;
  align-items: center;
}

.likes {
  margin-top: 20px;
  color: hsl(0, 60%, 20%);
  font-weight: bold;
  font-family: sans-serif;
  text-transform: uppercase;
  font-size: 20px;
}
Now let’s tell our server about it so when we request it, it responds with this file.
Add this route in index.js (below the root route):
app.get('/style.css', (req, res) => {
  res.sendFile(path.join(__dirname + '/style.css'))
})
And then let’s use it in our index.ejs by adding this at the bottom of <head>:
<link rel="stylesheet" href="./style.css" />
Displaying the button and the label
Open index.ejs and update it like this:
<!DOCTYPE html>
<html lang="en">
  <head>
    <meta charset="UTF-8" />
    <title>Realtime like app</title>
    <link rel="stylesheet" href="./style.css" />
  </head>
  <body>
    <div class="main">
      <button>
        <svg style="width:80px;height:80px" viewBox="0 0 24 24">
          <path
            fill="#000000"
            d="M12,21.35L10.55,20.03C5.4,15.36 2,12.27 2,8.5C2,5.41 4.42,3 7.5,3C9.24,3 10.91,3.81 12,5.08C13.09,3.81 14.76,3 16.5,3C19.58,3 22,5.41 22,8.5C22,12.27 18.6,15.36 13.45,20.03L12,21.35Z"
          />
        </svg>
      </button>
      <span class="likes">Likes: <%= likes %></span>
    </div>
  </body>
</html>
For this to work, we have to pass likes from the server when rendering the template.
So open index.js and update the root route like this:
let likes = 0

app.get('/', (req, res) => {
  res.render(path.join(__dirname + '/index.ejs'), { likes }, (err, html) => {
    res.send(html)
  })
})
Note how we defined likes above it.
To keep this example simple, we defined likes in the memory, which means its value will go back to 0 when the server restarts. Typically in real-world apps you’ll have your data stored in the database.
Incrementing likes by clicking on the button
To do so, we need to add a new route that increments likes and returns the new value. And then we’ll make a request to this endpoint from index.ejs, when the user clicks on the button.
Let’s define the route first, in index.js.
app.post('/like', (req, res) => {
  likes++
  res.json({ likes })
})
So it’s a POST endpoint at /like.
Now let’s listen for the button’s click event and send this request using the Fetch API.
Add the following above </body>:
<script>
  const btn = document.querySelector('button')
  const likesOutput = document.querySelector('.likes')
  btn.addEventListener('click', async () => {
    const response = await fetch('/like', { method: 'POST'})
    const data = await response.json()
    likesOutput.textContent = `Likes: ${data.likes}`
  })
</script>
The app is now ready to be used but without showing the updated value in realtime. So if you open the app in multiple browser windows and try to update one, you won’t see the value updated in realtime on other browser windows until you reload them.
Making it a real-time app
Socket.io isn’t the only way to build real-time apps but it’s the most popular one. Not only that, but it’s also very good and easy to use.
We’ve already installed socket.io, so let’s initialize it.
But before I show you how, note that socket.io is composed of two parts:
- The server that we integrate with node http server.
- The client library that we use on the browser to communicate with the server part.
To initialize the server part, open index.js and update the top part like this:
const app = require('express')()
const http = require('http').createServer(app)
const path = require('path')
const io = require('socket.io')(http)
So we imported socket.io and passed it the http server object.
Now let’s use the http object to run the server instead of app.
http.listen(3000, () => console.log('the app is running on localhost:3000'))
With that, socket.io is initialized on the server!
When socket.io is initialized it exposes /socket.io/socket.io.js endpoint. This endpoint contains the JS file that we’ll use in the browser to connect with socket.io. (So it’s the socket.io’s client library.)
Go to index.ejs and include that file above the <script> tag:
<script src="/socket.io/socket.io.js"></script>
After you add this, you should have the io object exposed globally on the browser (check that from the console).
To connect the browser to the server, just call io() and store the returned socket in a variable.
So put the following at the top of your <script> section (above const btn = document.querySelector('button')).
const socket = io()
Next, let’s make the server listen for connections from clients.
Below all routes, add this into index.js:
io.on('connection', (socket) => {
  console.log('a user connected!')
  socket.on('disconnect', () => {
    console.log('user disconnected!')
  })
})
To make sure it’s working, open up the browser and check your terminal. When you open a new tab, you’ll see “a user connected!”, and when you close it, you’ll see “user disconnected!”.
The socket object is related to the connected user. Note how we listen for a disconnect event on that specific socket — not on all sockets.
Three steps left to complete this app:
- When the user clicks on the like button, we should emit an event to the server about that.
- When the server is notified about that, it re-emits that event with the new value of likes to all other users (excluding the user who clicked the button).
- When other clients receives that event, they would update the likes label with the new value.
So step 1, let the server know that we updated the number of likes. To do this, open index.ejs and add this at the bottom of the button’s click handler:
socket.emit('likes:updated')
likes:updated is the name of the event — you can name it whatever you want.
Step 2, the server should listen to this event and re-emit it to other clients. So in index.js update your connection listener like this:
io.on('connection', (socket) => {
  console.log('a user connected!')
  socket.on('likes:updated', () => {
    socket.broadcast.emit('likes:update', likes)
  })
  socket.on('disconnect', () => {
    console.log('user disconnected!')
  })
})
Using socket.broadcast.emit sends the event to all other users (excluding the sender).
Note that we’re sending an event with a different name, likes:update (not likes:updated).
Our last step is to listen for this event on the client so we update the likes label.
So in index.ejs, before </script>, add this:
socket.on('likes:update', (likes) => {
  likesOutput.textContent = `Likes: ${likes}`
})
That’s it! Now our app is completely a real-time app!
If your code is not working, compare it with the source code of this demo on GitHub to make sure you haven’t forgotten anything.