
What differentiates a good app from a great one is the usability and smoothness of its parts. You have to put a lot of effort and care to create what I call a “seamless UI”.
There are countless of libraries in the JavaScript ecosystem that help you create almost anything you want. But I would argue that there are none that help you create exactly what you want. You usually have to sacrifice something for the convenience of not implementing it yourself.
It’s true that sometimes you don’t need to put time and effort on some parts of the app. For example, you don’t need to build your own image cropper if it’s just used to crop user avatars. But if you are building an image editor app, then that image cropper might be a crucial part of your app, which might even be a deal breaker to the users of the app.
Table of Contents
- What this article is about?
- The example we will build
- It’s more work than you think
- Things to learn before the example
- Let’s get started with the example
- The HTML
- The CSS
- A general overview of how it works
- Mouse events and the three phases
- Getting the draggable item
- Moving the draggable item
- Unset the draggable item on dragEnd
- How to know when and where to move other items?
- How to apply the above solution in code
- updateIdleItemsStateAndPosition() explained
- Why did I use transform to move items?
- How to update an element’s position in the DOM?
- Applying the new order on dragEnd
- Resetting the cached items array
- Supporting touch screens
- Disable page scroll while dragging
- Now it’s your turn to create seamless UIs
What this article is about?
In this article, we will build an example that demonstrates how smooth, user-friendly widgets are built. I will illustrate the thinking process behind building these types of UIs.
These types of UIs tend to have lots of details to handle in the code. Following an organized approach is much better than implementing them in a piecemeal fashion.
Although we will build a fully working example that shows how these “seamless UIs” are built, the example should not be the main focus for you; instead pay attention to the way it’s being implemented.
The example we will build
The example is a widget for reordering items by dragging them—it’s called a drag-to-reorder widget.
Before continuing to read, I recommend that you play with the example on CodePen and take a look at the full code on GitHub. This way, it will be easier for you to follow the article and focus on the concepts rather than the details of the example.
It’s more work than you think
More work doesn’t necessarily mean more code. In fact, most of the time, it means the opposite. However, the challenge lies in coming up with the code that makes your UI seamless.
The good news is that the more you practice and become more comfortable with tasks like DOM manipulation and understanding how the browser works, the better and faster you will become. So, as with everything, practice makes perfect.
In this article, I will try to explain everything in detail, but I’m also assuming that you have an intermediate knowledge of HTML, CSS, and JavaScript to follow along.
Things to learn before the example
Before diving into the example, there are a few general concepts that you need to understand to make it easier to follow.
In the next few sections, you will learn about reading positions with getBoundingClientRect() and how dragging works in general.
getBoundingClientRect() is your friend
Reading the position and dimensions of elements is an essential part of doing any UI work with JavaScript.
There are several ways to do that, like element.clientWidth() to get its inner width excluding scrollbars, and element.offsetLeft() to get the position of the element relative to its nearest ancestor element that has position other than static. There are more you can check, and they have their own use cases.
However, for most things, you just need to use element.getBoundingClientRect() to get the position and dimensions of the element. This method returns an object of type DOMRect that contains this list of properties:
left: the distance in pixels from the left edge of the viewport to the left edge of the element.top: the distance in pixels from the top edge of the viewport to the top edge of the element.right: the distance in pixels from the left edge of the viewport to the right edge of the element.bottom: the distance in pixels from the top edge of the viewport to the bottom edge of the element.widthandheight: the width and height of the element including its content, scrollbar, and padding.
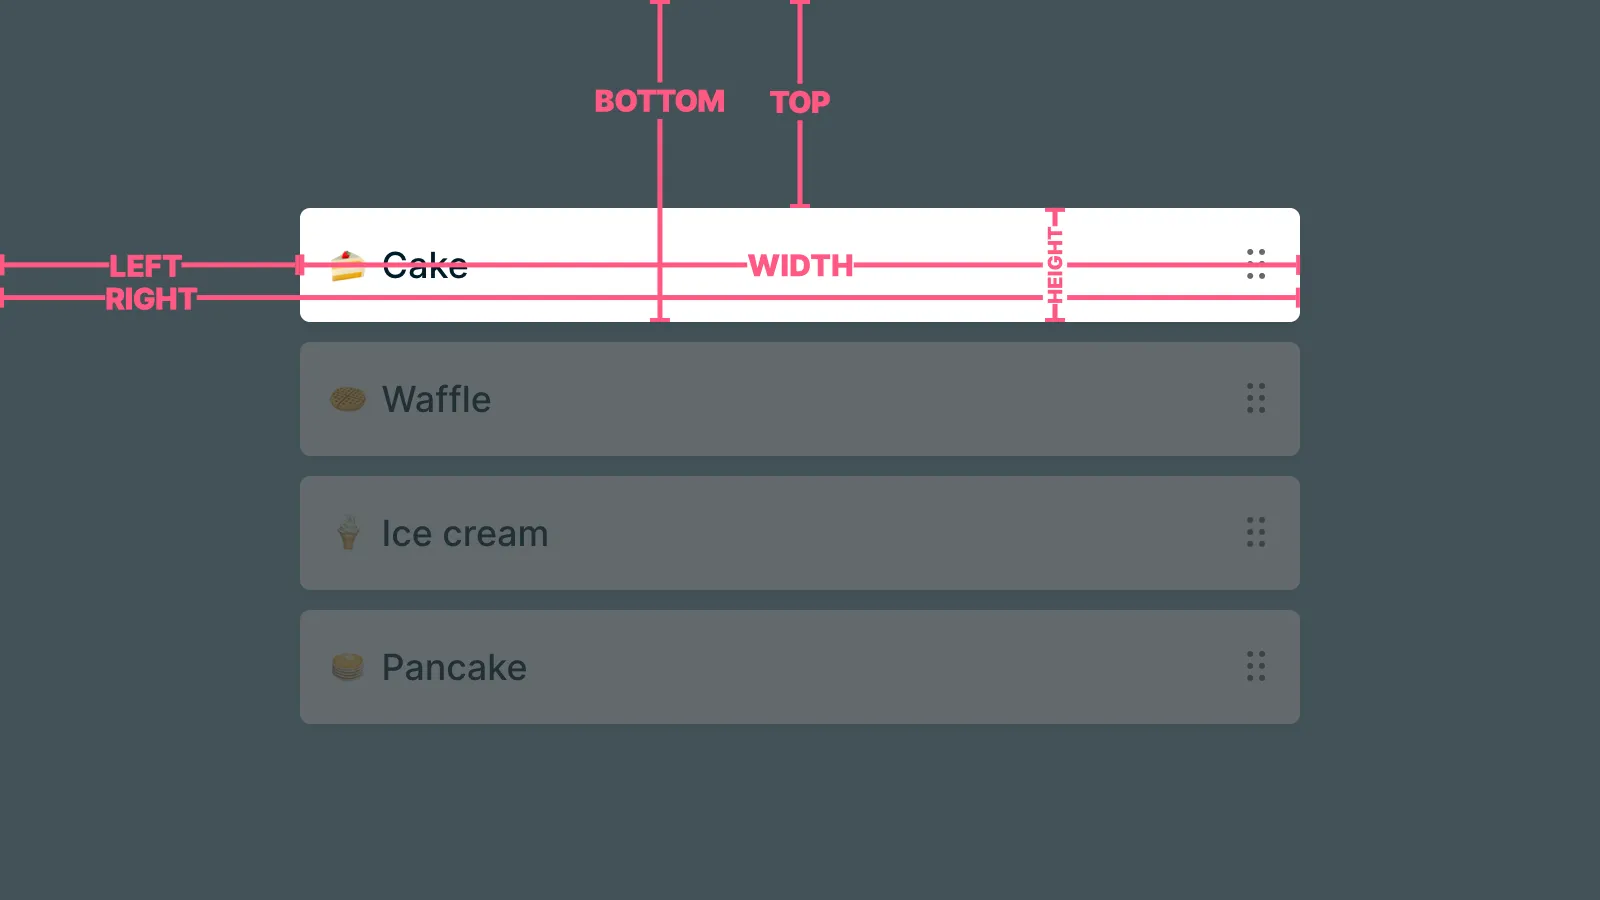
These values are preferred in most interactive UI use cases because they are relative to the viewport, which makes it easy to reason about the element’s position and how to modify it clearly.
A big use case of DOMRect values is comparing the positions of two elements. When we are using positions relative to the same starting point, in this case the viewport, then it will be easy to do all the calculations and comparisons for their positions.
In other words, if elementA has a top value of 100px and a left value of 200px, and elementB has the same values, then they are displayed exactly at the same point, overlapping each other.
How dragging works
Implementing dragging is a very simple process once you understand how it works.
The core idea of dragging is this: add the offset position to the current position of the element.
The offset position is calculated based on the mouse movement. It’s called an offset because there’s a start and an end points. The start position is the position of the mouse click. The end position is the position of the mouse after moving it.
For example, if the start position of the mouse is left: 100px, top: 200px and the user moves the mouse 50px to the right, the end position would be left: 150px, top: 200px. To calculate the offset, subtract the end position from the start position like this: end.left - start.left for left, and end.top - start.top for top. So, for this example, the offset will be: left: 50px, top: 0px.
After you calculate the offset, the next step will be adding that offset to the current element’s position.
If, for example, the current element’s position is left: 20px, top: 100px, the new position of that element after dragging will be: left: 70px, top: 100px—in real life offsets will be smaller because they are based on the mouse movement, which would be very granular, 1px for example.
To summarize, NEW_ELEMENT_POSITION = CURRENT_ELEMENT_POSITION + OFFSET_POSITION.
No need to know the current position with the transform CSS property
In theory, we need to know the current position to update it with the mouse’s offset position. However, if we are using the transform CSS property, we will not need it because transform updates the element’s position relative to its current position.
For example, if you set transform: translateX(100px) on an element, the new position of that element would be its current position + 100px without us having to know what the current position is.
So, this means we just need to know the mouse’s offset position to get dragging working in our example.
Let’s get started with the example
Now that we have prepared ourselves with the necessary knowledge for the example, let’s dive into the example and learn how to build it step by step.
The HTML
Typically, I would split the code into files (HTML, CSS, and JavaScript files), but for simplicity, we will write all the code in a single HTML file.
Let’s start by adding the HTML code for this example.
<!DOCTYPE html>
<html lang="en">
<head>
<meta charset="UTF-8" />
<meta name="viewport" content="width=device-width, initial-scale=1.0" />
<title>Drag to Reorder</title>
</head>
<body>
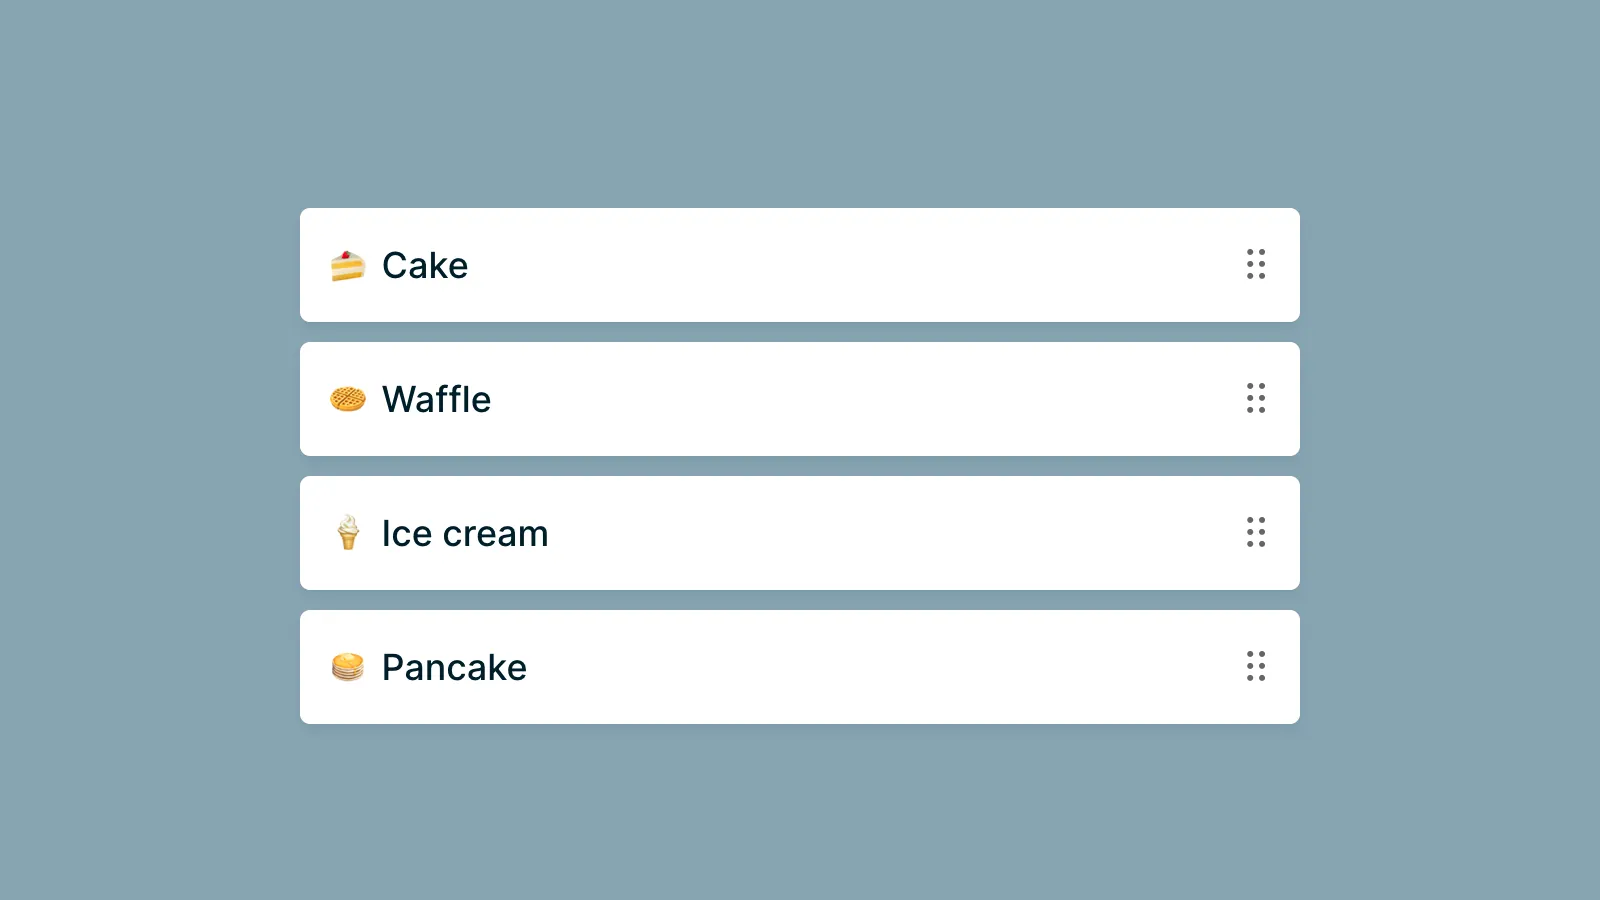
<div class="list js-list">
<div class="list__item is-idle js-item">
🍦 Ice cream
<div class="drag-handle js-drag-handle"></div>
</div>
<div class="list__item is-idle js-item">
🥞 Pancake
<div class="drag-handle js-drag-handle"></div>
</div>
<div class="list__item is-idle js-item">
🧇 Waffle
<div class="drag-handle js-drag-handle"></div>
</div>
<div class="list__item is-idle js-item">
🍰 Cake
<div class="drag-handle js-drag-handle"></div>
</div>
</div>
</body>
</html>
The list container has a .list class and each item has .list__item—I’m following the BEM naming convention here.
In each item, we display the content, like 🍦 Ice cream, and the drag handle, which has a .drag-handle class.
The handle is what we will use for initiating the dragging behavior.
Each item would be in one of two states: idle and draggable. We indicate the currently active one by using the .is-idle and .is-draggable classes, respectively.
For clarity, I prefer to follow the convention of separating CSS selectors used for styling from those used for JavaScript. I achieve this by prefixing classes with js- for the ones intended to be used in JavaScript. So in this example I have added js-list for the list container, js-item for the items, and js-drag-handle for the drag handle.
The CSS
Instead of showing you the whole CSS, I’ll split it into chunks to make it easier to follow.
* {
  box-sizing: border-box;
}

:root {
  height: 100%;

  background: #87a5b2;

  font-family: Inter, system-ui, Avenir, Helvetica, Arial, sans-serif;
  line-height: 1.5;
  font-weight: 400;
  font-synthesis: none;
  text-rendering: optimizeLegibility;
  -webkit-font-smoothing: antialiased;
  -moz-osx-font-smoothing: grayscale;
  -webkit-text-size-adjust: 100%;
}

body {
  height: 100%;
  display: flex;
  align-items: center;
  justify-content: center;
}
First, I switched the box sizing of all elements to border box to be able to specify the overall width and height of elements, including padding and margin.
In :root, which is the same as html, I set the height to 100%, changed the background color to a blueish color, and improved the styling of the font.
For the body, I also set the height to 100% and used Flexbox to center the content of the page.
.list {
  max-width: 500px;
  width: 100%;

  display: flex;
  flex-direction: column;
  gap: 10px 0;
}
For the list container, I set its width to 500px and switched it to Flexbox with column direction to add a gap between its items. In this example, I set the vertical gap to 10px, but you can change it to whatever you want.
.list__item {
  width: 100%;
  padding: 15px;

  display: flex;
  align-items: center;

  position: relative;

  will-change: transform;

  background: white;
  color: #001d29;
  border-radius: 5px;
  box-shadow: 0 4px 6px -1px #001d2910, 0 2px 4px -2px #001d2910;

  font-weight: 500;
  font-size: 18px;
}
For the items, I first ensured that they spanned the entire width and added some padding for the content.
Then, I made it Flexbox to center its content vertically with align-items.
I set its position to relative to position its child .list__drag-handle using absolute position.
The will-change here is for performance purposes, which I’ll explain later.
The rest is for improving its appearance with colors, shadows, and border radius.
.list__drag-handle {
  position: absolute;
  right: 0;
  width: 44px;
  height: 44px;
  display: flex;
  justify-content: center;
  align-items: center;
}

.list__drag-handle::after {
  content: '⠿';
  font-size: 25px;
  color: #00000099;
}
For the drag handle, I used the ::after pseudo element to display the dragging symbol. And then I positioned it at the right of the item using absolute positioning.
.list__item.is-idle {
  transition: 0.25s ease transform;
}

.list__item.is-idle .list__drag-handle {
  cursor: grab;
}

.list__item.is-draggable,
.list__item.is-draggable .drag-handle {
  cursor: grabbing;
}
Based on the current state of the item, I enable transition and change the cursor type. If it was in idle mode, then it should have animation and use grab for the cursor, but for the draggable mode, use grabbing for the cursor and disable transition.
Initially, all of the items start with the idle state until we change them later from our JavaScript.
.list__item.is-draggable {
  z-index: 10;
}
The last piece here is the styling for the item when it’s in the draggable mode. All we need to do here is set its z-index to something higher than idle items to make it appear above them while dragging.
That’s it for the CSS. If you reload your page, you should see this:
A general overview of how it works
To make the example easier to follow, I will give you a quick overview of how the whole thing would work.
- We will set up a three event listeners for dragging items: dragStart, drag, and dragEnd. The dragStart event is for the first click on the item. The drag event will run for every movement of the mouse while the user is still clicking the item. And the dragEnd event will fire when the user releases the mouse button. Note that these are not the actual names of the events, they are the function names for the handlers.
- When the dragStart event is triggered, we will prepare several things for the dragging interaction. We’ll prepare things like setting the initial state for all items and converting the clicked item into a draggable item.
- In the drag handler, we will write the code for dragging the draggable item, and then update the other items state and position based on where the user wants to drop the draggable item.
- In the dragEnd handler, we will handle saving the new order of the items, and then do some cleanups like removing the drag event listener and resetting the state of the items.
Mouse events and the three phases
In the overview section, I talked about the three event handlers that we will implement: dragStart, drag, and dragEnd.
Each one represents a phase in the interaction.
- dragStart is when the user starts the dragging by clicking the mouse.
- drag is triggered while the user is moving the mouse while clicking—in other words, it’s the dragging phase.
- dragEnd is when the user releases the mouse button to end the dragging process.
These are mouse-related events. This means we need to define event listeners for the mouse, and they are:
- mousedown for dragStart.
- mousemove for drag.
- mouseup for dragEnd.
Let’s define them.
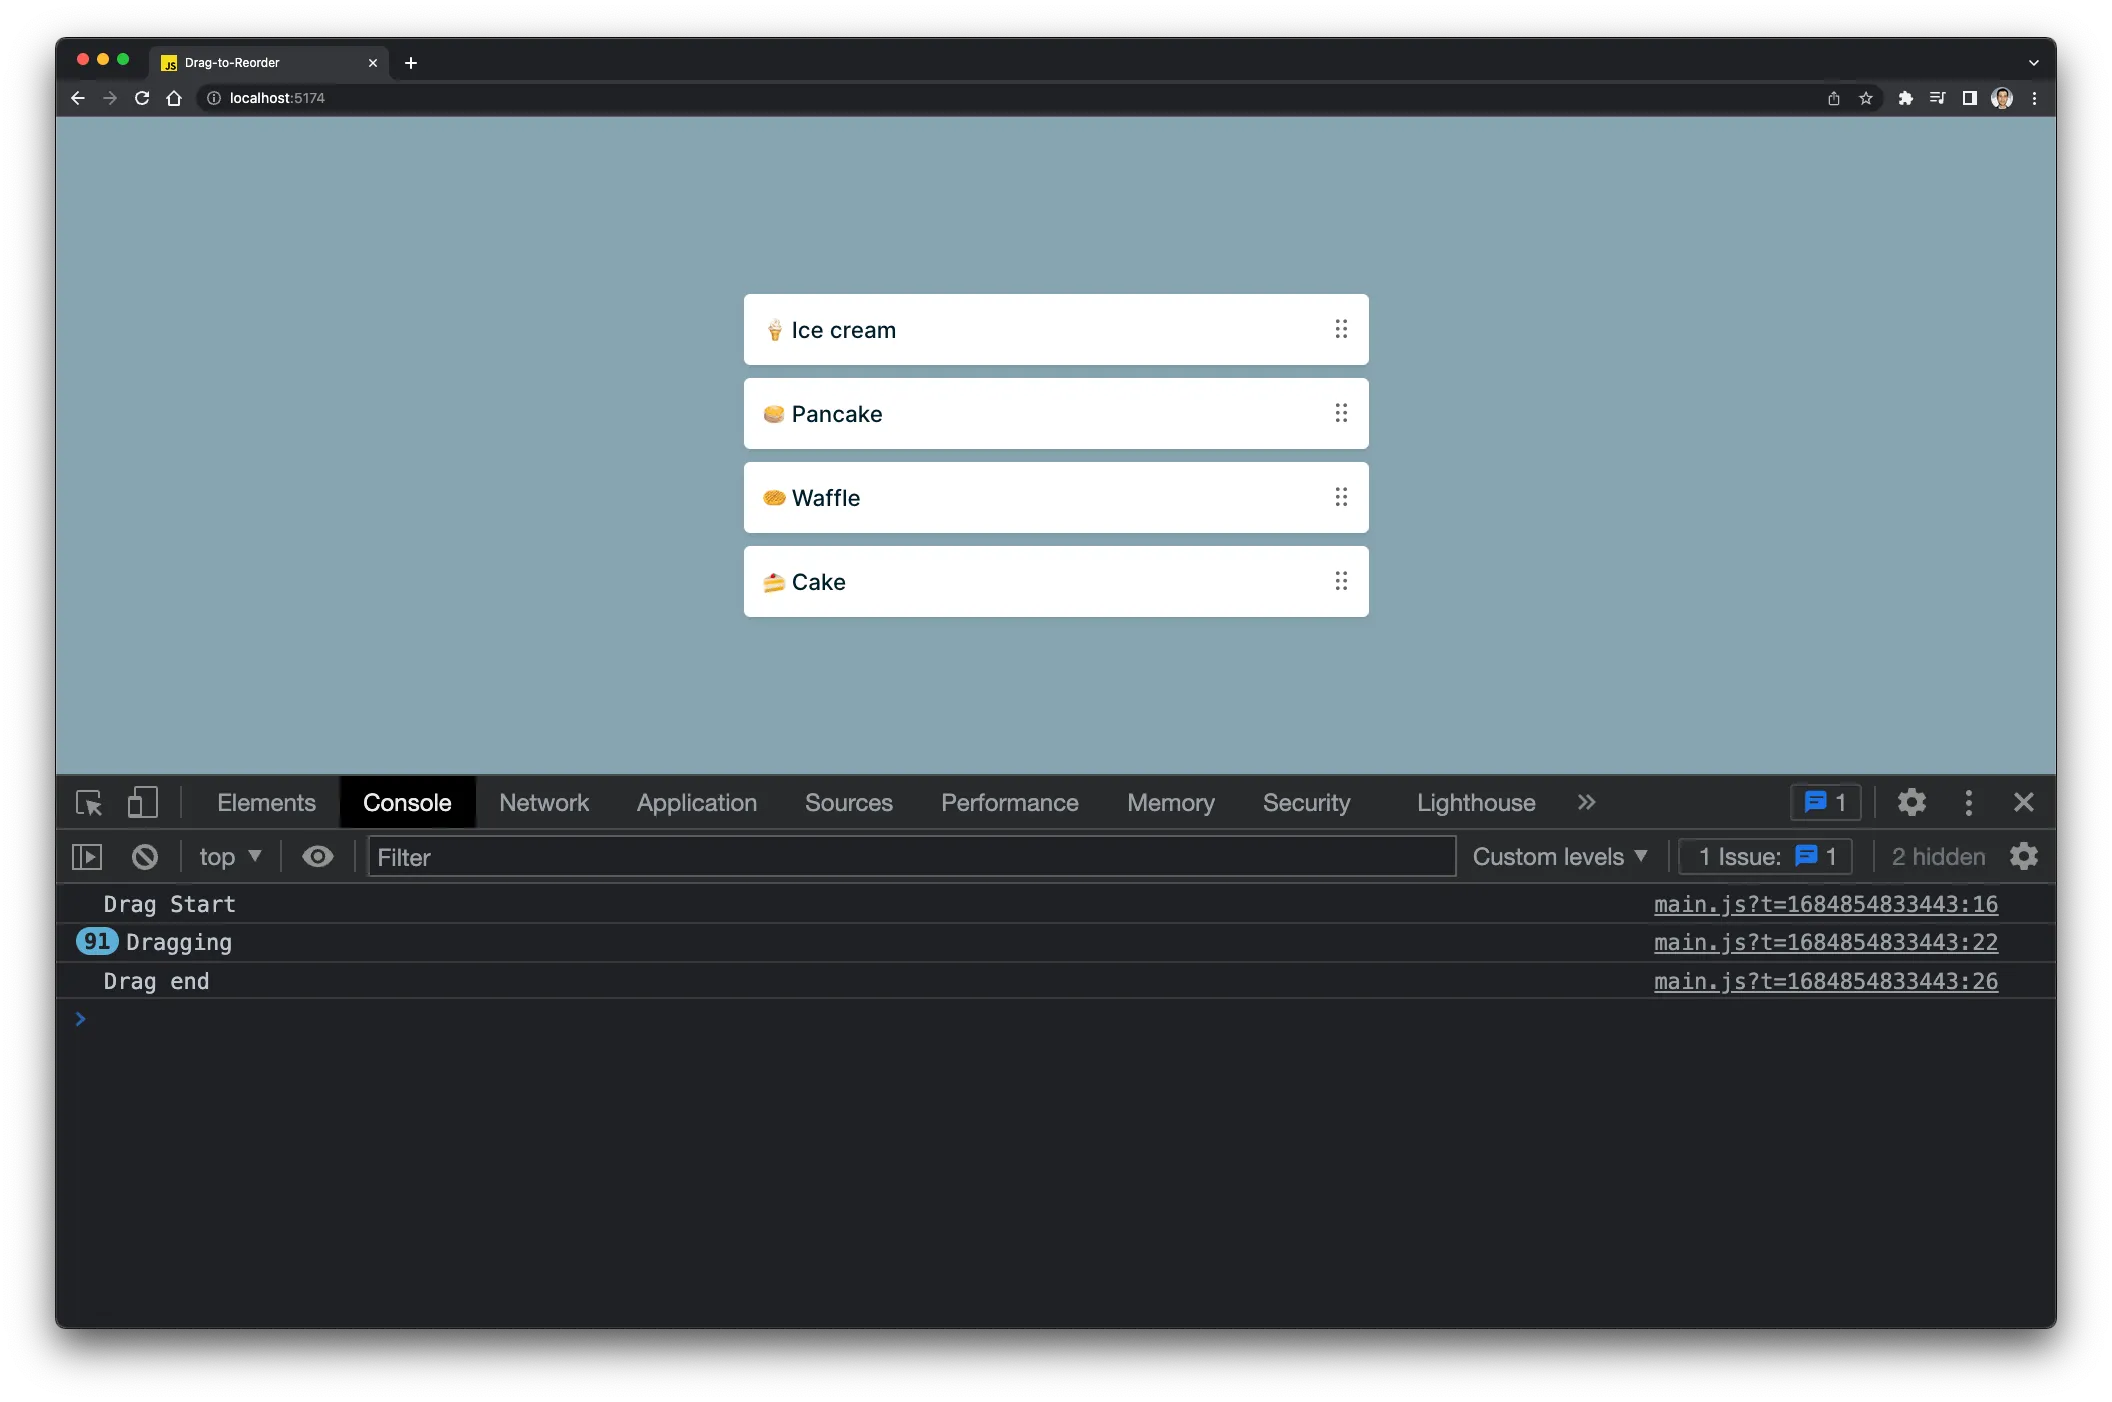
In your script section, add this:
let listContainer

function setup() {
  listContainer = document.querySelector('.js-list')

  if (!listContainer) return

  listContainer.addEventListener('mousedown', dragStart)

  document.addEventListener('mouseup', dragEnd)
}

function dragStart(e) {
  console.log('Drag Start')

  document.addEventListener('mousemove', drag)
}

function drag(e) {
  console.log('Dragging')
}

function dragEnd() {
  console.log('Drag end')

  document.removeEventListener('mousemove', drag)
}

setup()
I like to wrap the starting point of the script in a function called setup(), which I call at the very bottom of the code.
In setup, I first queried the list container element and stored it in a variable that I defined at the top of the code. This way, we don’t need to query it every time we need it while dragging—it’s cached to improve performance.
Then I added the mousedown event listener on the list container. The alternative would be adding it on every item element in the list, but with our approach, the event will always be fired for new items added to the list—if they are added dynamically by clicking an add button, for example.
So that event will be fired when you click any where in the list container (event on the gaps). Later in the article, I will show you how to detect if the user clicks on an item in that list to start the dragging process.
Below that, I added another event listener for the mouseup. I added it on the document object because the user should be able to end the dragging when they release the mouse button anywhere on the page (not when hovering over a specific element).
In the dragStart function, I first added a log message to check if it works, and then added an event listener for mousemove. The reason I added this event in dragStart is to make sure it’s only fired when the user started dragging—we don’t need to run the drag event when the user hasn’t started dragging.
In drag, I’m just logging some message to make sure it works.
And in dragEnd, I removed the event listener for the mousemove event after logging a test message.
You can test your work in the browser by clicking anywhere in the list, moving the mouse, and then releasing the mouse button. If everything works correctly, you should see these log messages in the dev console.
Getting the draggable item
We can get the draggable item by checking which item the user clicked to drag. We can do that from the dragStart() function.
Since this is an event handler, we can access its event object from its parameters. We will use that object to check if the clicked element is the drag handle element, which has .js-drag-handle class.
function dragStart(e) {
  if (e.target.classList.contains('js-drag-handle')) {
    draggableItem = e.target.closest('.js-item')
  }

  if (!draggableItem) return

  document.addEventListener('mousemove', drag)
}
I updated dragStart() to get the draggable item and store it in a variable called draggableItem. To make it work, we need to define that variable at the top of our script code below listContainer variable.
let listContainer
let draggableItem
Here’s how fetching the draggable item works in dragStart():
- In an if statement, I checked to see if the element the user clicked contains the
js-drag-handleclass. To get the clicked item, I usede.targeton the event object. - If the clicked item was the handle, then get its
.js-itemparent. Doing that will get us the item that has the drag handle the user clicked. I usedclosest()on the clicked item to get its closest parent, which should be the item the user wants to drag.
Below that, I added a check to see if draggableItem is still undefined. If it’s undefined, then it means something went wrong while getting the draggable item; and this case, we should stop the execution of the function by returning from it.
If everything went right, we should switch the state of that item to draggable. To do that, we just need to replace the is-idle class to is-draggable on that item.
Instead of adding all the code directly in dragStart(), I prefer to extract it into a small function to make it more readable.
So, let’s add a function named initDraggableItem to switch its state to draggable.
function initDraggableItem() {
  draggableItem.classList.remove('is-idle')
  draggableItem.classList.add('is-draggable')
}
And then call it in dragStart():
function dragStart(e) {
  if (e.target.classList.contains('js-drag-handle')) {
    draggableItem = e.target.closest('.js-item')
  }

  if (!draggableItem) return

  initDraggableItem()

  document.addEventListener('mousemove', drag)
}
Moving the draggable item
As I explained earlier, to drag an item we need to get the mouse’s offset position and use it in the item’s transform CSS property.
To get the mouse offset position, we need to get the mouse start position and end position.
The start position is the position of the mouse click when the user started the dragging.
First let’s add variables to hold the mouse start positions at the top of our code (along with the other variables).
let pointerStartX
let pointerStartY
Then set their values in dragStart() using the event clientX and clientY properties.
function dragStart(e) {
  if (e.target.classList.contains('js-drag-handle')) {
    draggableItem = e.target.closest('.js-item')
  }

  if (!draggableItem) return

  pointerStartX = e.clientX
  pointerStartY = e.clientY

  initDraggableItem()

  document.addEventListener('mousemove', drag)
}
Now let’s calculate the offset position in drag() and then update the item translate position.
function drag(e) {
  if (!draggableItem) return

  const currentPositionX = e.clientX
  const currentPositionY = e.clientY

  const pointerOffsetX = currentPositionX - pointerStartX
  const pointerOffsetY = currentPositionY - pointerStartY

  draggableItem.style.transform = `translate(${pointerOffsetX}px, ${pointerOffsetY}px)`
}
Notice how I checked if draggableItem is valid before continuing—this way we’ll be sure that we won’t get undefined errors and it will actually work.
Dragging items should now work as expected. You can test that in your browser.
Unset the draggable item on dragEnd
You may have noticed while testing that the item remains in the spot where you released the mouse button. But for our example, when the drag ends, the items should go back to their valid positions.
At this point, we are not concerned about reordering, but we should ensure that the draggable item returns to the list upon its release. To do that, we need to switch it back to the idle state.
Let’s do that in a new function called unsetDraggableItem.
function unsetDraggableItem() {
  draggableItem.style = null
  draggableItem.classList.remove('is-draggable')
  draggableItem.classList.add('is-idle')
  draggableItem = null
}
Then call it from dragEnd().
function dragEnd() {
  if (!draggableItem) return

  unsetDraggableItem()

  document.removeEventListener('mousemove', drag)
}
Unsetting the draggable item and removing the mousemove event listener are part of the cleanup process. So let’s make this clear by moving them into a new function called cleanup().
function dragEnd() {
  if (!draggableItem) return

  cleanup()
}

function cleanup() {
  unsetDraggableItem()

  document.removeEventListener('mousemove', drag)
}
Now releasing the draggable item should make it return to the list.
How to know when and where to move other items?
Knowing how idle items react to the draggable item while dragging it is the trickiest part. There’s no standard way to handle this; we have to come up with a solution ourselves.
I had tried a few ideas before finding the best approach to handling this kind of interactions. For example, I tried to maintain two arrays of items, one for the initial order and the other for the target order, but it wasn’t an efficient solution and had some bugs.
The point here is that it’s okay if you couldn’t find the perfect solution for these kinds of problems on the first try. I have found that the more solutions I try, the closer I get to the “good” solution.
The solution I used here is adding two states to each item element. One to detect the current relative position to the draggable item, and the other to indicate whether the item has been toggled or not.
Based on these states, I know where and when to move the idle items when I drag the draggable item over them.
Let me explain this with an example. Let’s say we have four items and we want to drag the second item above and below other items.
Case 1: moving item #2 above item #1 should push item #1 down by the same amount as its height.
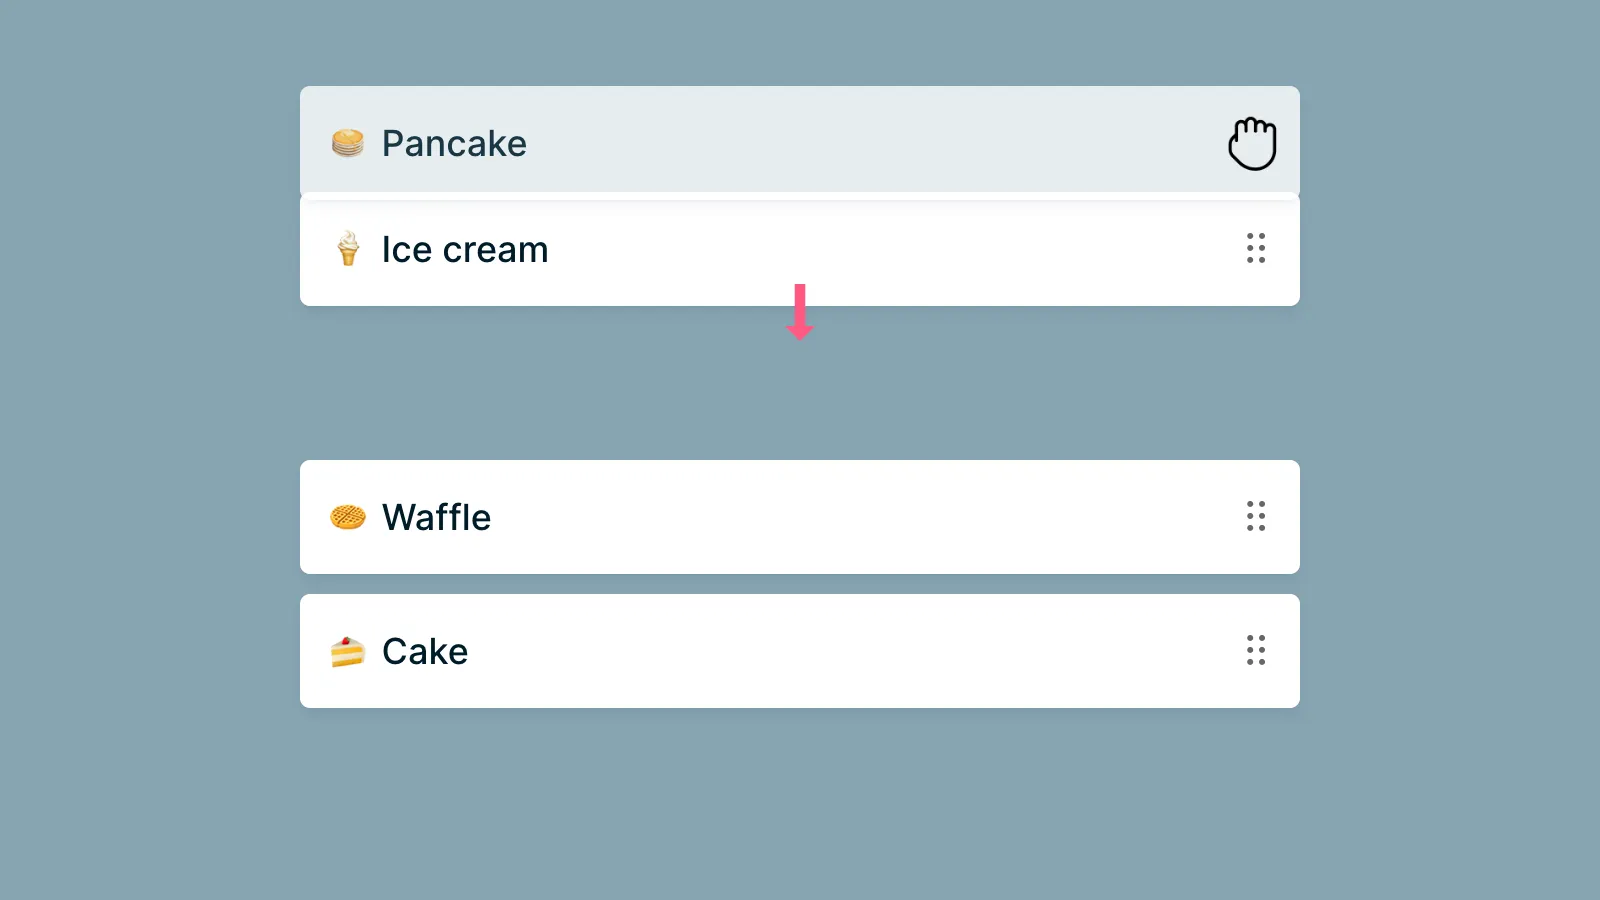
Case 2: moving item #2 below item #3 should push item #3 up by the same amount as its height.
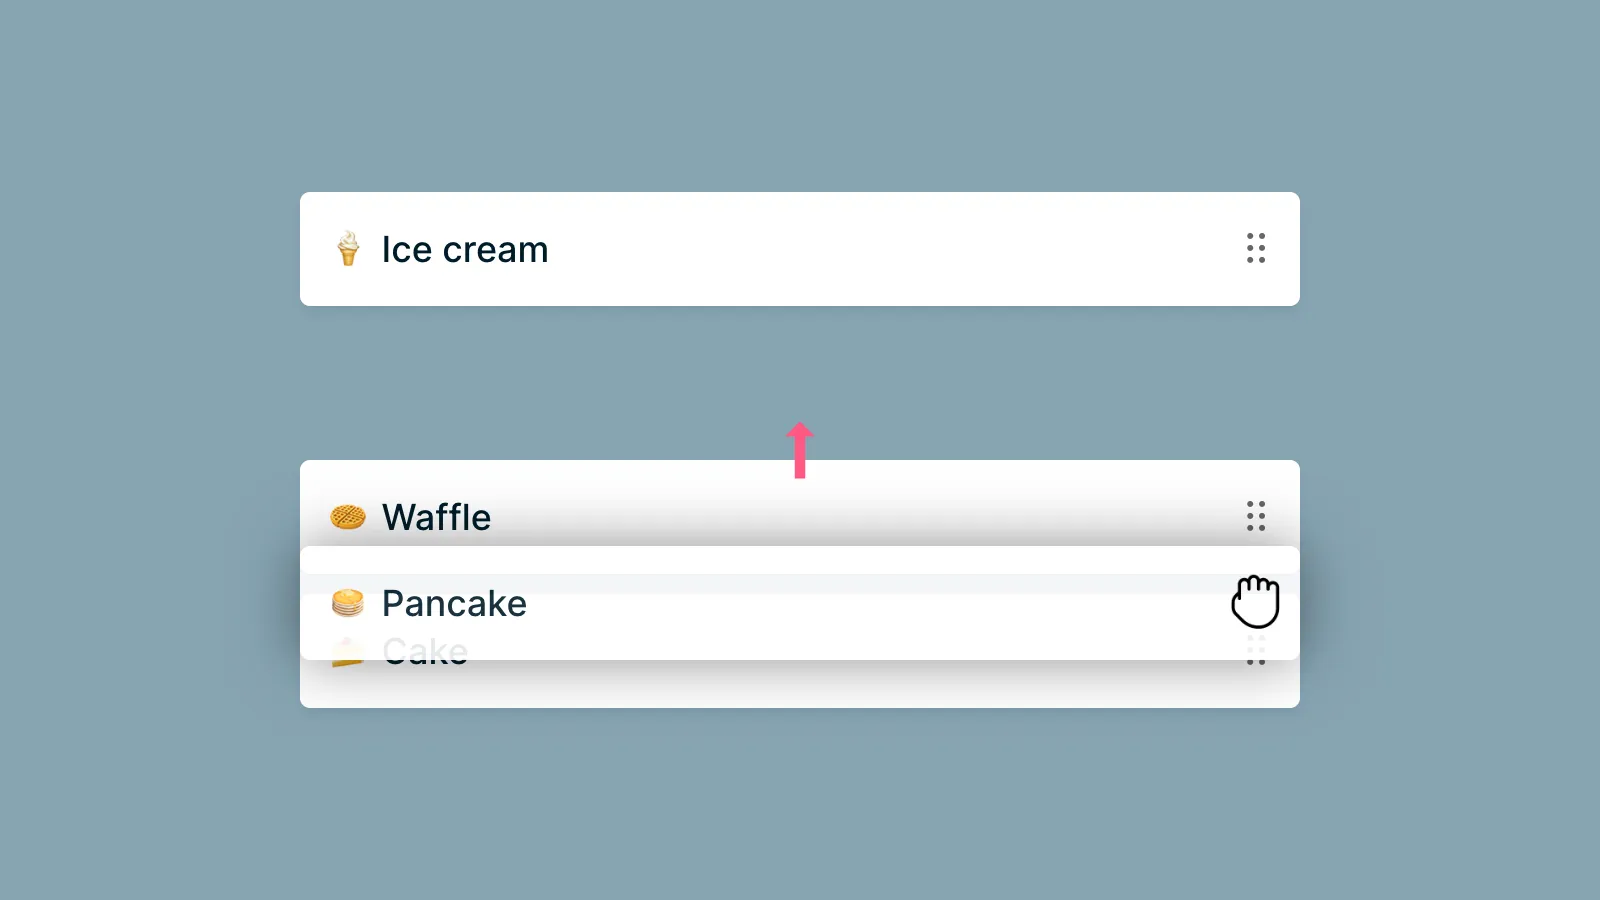
Case 3: moving item #2 below item #4 should push both item #3 item #4 up by the same amount as a single item height.
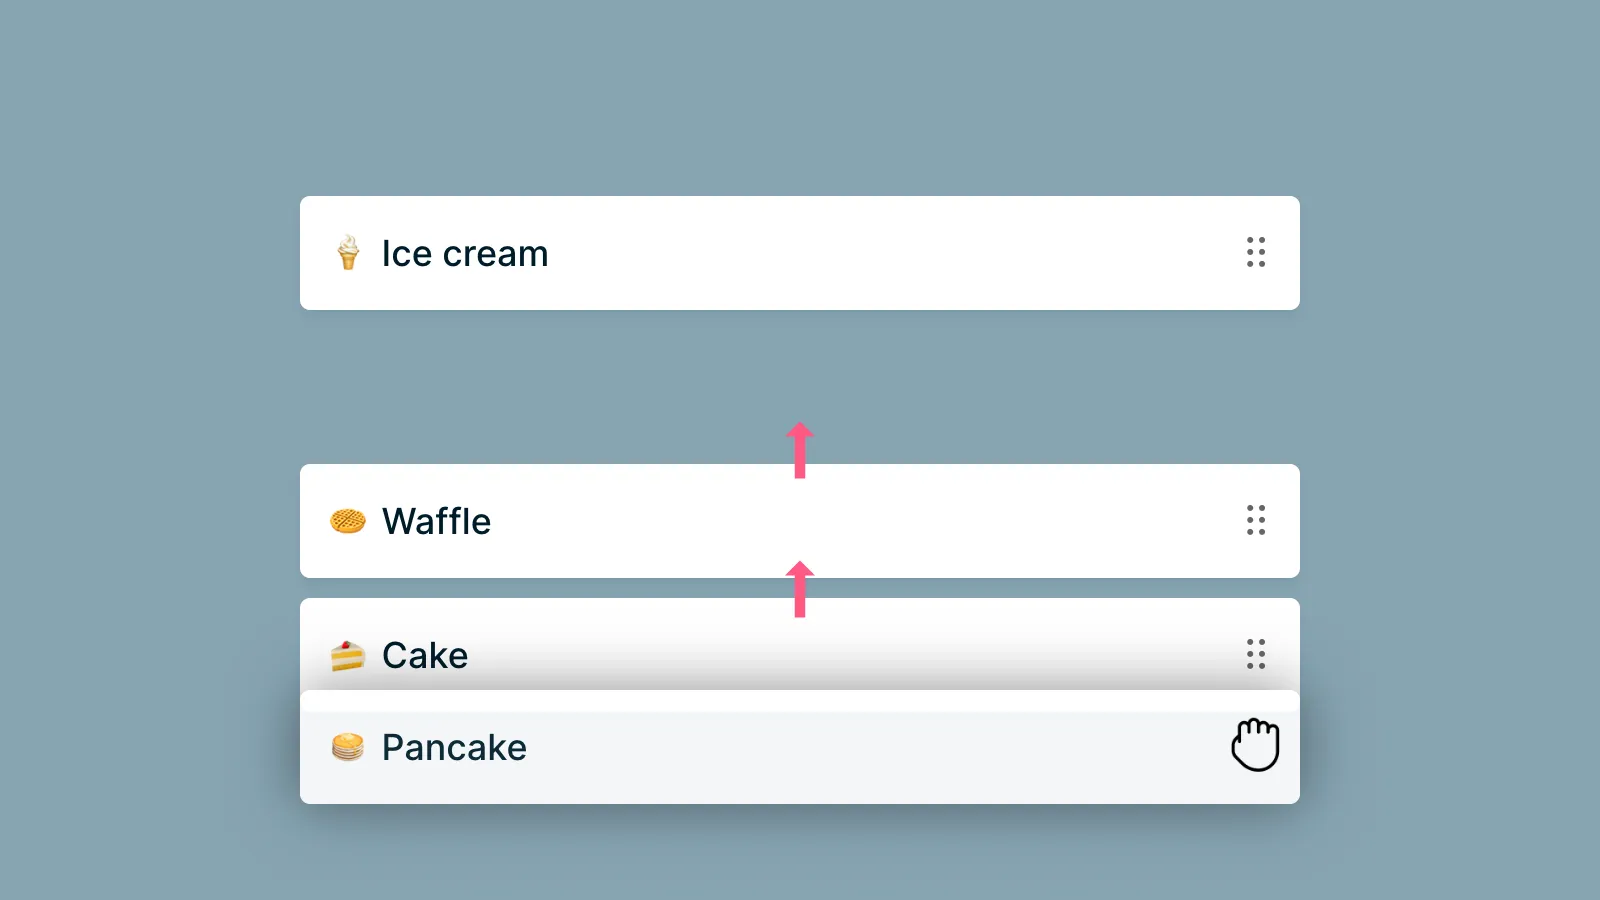
Case 4: moving item #2 back to its original position (below item #1) should return each item to its original position.
Based on these observations, I noticed that the direction each item moves to is based on which item is draggable. If the item is above the draggable item, it should always move down, but if it’s below it, it should always move up.
The best moment to specify that direction state is when the user starts dragging—dragStart(). At that point, we can loop through all the idle items and set the direction as a state on each element—I’ll show you how later, but it will be using data attributes.
Another thing I noticed there is that I should only move the item if a certain condition happened. For example, item #1 should move down only if the draggable item is above it. If the draggable items is below it, on the other hand, then it should not move, which also means move it back to its original position if it was toggled before—this can happen when you drag item #2 above item #1 and then move item #2 below it in the same dragging session.
To convert this observation into code, we need to have a state on each item to indicate whether an item is toggle (moved) or not (in original position).
To conclude, we should add two states to each item: relativePosition (above/below) and toggled (true/false).
Using relativePosition we know the direction the item should move to when we drag an item above it or below it.
And with the toggled state, we know whether we should move an item or not. If it’s true then move it to the direction specified in relativePosition, but if it’s false then move it back to its original position.
How to apply the above solution in code
The steps of this solution would be as follows:
- On
dragStartevent, loop through all idle items (all items except the draggable item) in the list. - If the item is above the draggable item, set
data-is-aboveattribute on its element. - If the item is below the draggable item, don’t add anything—the absence of
data-is-abovemeans the item is below it.
Let’s write that in a new function named initItemsState.
function initItemsState() {
  getIdleItems().forEach((item, i) => {
    if (getAllItems().indexOf(draggableItem) > i) {
      item.dataset.isAbove = ''
    }
  })
}
And then call it from dragStart().
function dragStart(e) {
  if (e.target.classList.contains('js-drag-handle')) {
    draggableItem = e.target.closest('.js-item')
  }

  if (!draggableItem) return

  pointerStartX = e.clientX
  pointerStartY = e.clientY

  initDraggableItem()
  initItemsState()

  document.addEventListener('mousemove', drag)
}
Notice how I’m fetching idle items and all items in initItemsState using getIdleItems() and getAllItems() functions. These are helper functions that we don’t have yet. So, let’s create them.
let items = []

function getAllItems() {
  if (!items?.length) {
    items = Array.from(listContainer.querySelectorAll('.js-item'))
  }
  return items
}

function getIdleItems() {
  return getAllItems().filter((item) => item.classList.contains('is-idle'))
}
In getAllItems(), I’m querying all items (including the draggable item) and store them in items to cache them—to improve performance.
In getIdleItems(), I use getAllItems() and filter out the draggable item to return only the idle items. I wrote this function in this way to ensure we are utilizing the cached version from getAllItems() and to avoid duplicating the code in multiple places.
That took care of setting the initial state for the idle items.
Next, we need to update the state of the idle items on every drag event.
- On
dragevent, loop through all the idle items in the list. - Using
getBoundingClientRect(), check whether the draggable item is currently above or below the item you’re checking. This check is different than thedata-is-abovestate. This check is about the real relative position of the draggable item while it’s being dragged over all other items. - There are two cases for items: the item with
data-is-aboveset, which means the original relative position of this item is above the draggable item. And the other case is the item withoutdata-is-aboveset, which means this item was initially below the draggable item. - For items with
data-is-above: if you drag the draggable item above it, this item should be toggled by settingdata-is-toggledand moved down. But if you drag the draggable item below that item, this item should be untoggled by removingdata-is-toggledand moved back to its original position. - For items without
data-is-above: if you drag the draggable item below it, this item should be toggled by settingdata-is-toggledand moved up. But if you drag the draggable item above that item, this item should be untoggled by removingdata-is-toggledand moved back to its original position.
We’ll write that code in a new function called updateIdleItemsStateAndPosition() (I’ll explain this code in detail in the next section).
function updateIdleItemsStateAndPosition() {
  const draggableItemRect = draggableItem.getBoundingClientRect()
  const draggableItemY = draggableItemRect.top + draggableItemRect.height / 2
  const ITEMS_GAP = 10

  // Update state
  getIdleItems().forEach((item) => {
    const itemRect = item.getBoundingClientRect()
    const itemY = itemRect.top + itemRect.height / 2
    if (isItemAbove(item)) {
      if (draggableItemY <= itemY) {
        item.dataset.isToggled = ''
      } else {
        delete item.dataset.isToggled
      }
    } else {
      if (draggableItemY >= itemY) {
        item.dataset.isToggled = ''
      } else {
        delete item.dataset.isToggled
      }
    }
  })

  // Update position
  getIdleItems().forEach((item) => {
    if (isItemToggled(item)) {
      const direction = isItemAbove(item) ? 1 : -1
      item.style.transform = `translateY(${
        direction * (draggableItemRect.height + ITEMS_GAP)
      }px)`
    } else {
      item.style.transform = ''
    }
  })
}

function isItemAbove(item) {
  return item.hasAttribute('data-is-above')
}

function isItemToggled(item) {
  return item.hasAttribute('data-is-toggled')
}
Notice how this function has two helper functions: isItemToggled() and isItemAbove(), which make it more readable.
Next, let’s call updateIdleItemsStateAndPosition() from drag().
function drag(e) {
  if (!draggableItem) return

  const currentPositionX = e.clientX
  const currentPositionY = e.clientY

  const pointerOffsetX = currentPositionX - pointerStartX
  const pointerOffsetY = currentPositionY - pointerStartY

  draggableItem.style.transform = `translate(${pointerOffsetX}px, ${pointerOffsetY}px)`

  updateIdleItemsStateAndPosition()
}
If you test this in the browser, you should be able to drag an item and see how other items move based on the position you drag to.
updateIdleItemsStateAndPosition() explained
This function is very important to understand, so I’m going to dedicate this section to explaining its details. In this function, we update the state of all idle items, which is basically marking them as toggled or not. After that, we update the position of each item based on its toggled state.
You can break this function into two functions, like updateIdleItemsState and updateIdleItemsPosition, but I prefer to keep them in the same function because they should always run together and in the same order.
Before we start with the code for updating the state, let’s take a look at the variables we have.
const draggableItemRect = draggableItem.getBoundingClientRect()

const draggableItemY = draggableItemRect.top + draggableItemRect.height / 2

const ITEMS_GAP = 10
The first variable is to get the bounding rect for the draggable item. In the second variable, we use the bounding rect to calculate the Y position of that item. This position is the Y position of the center of the item. We need it to compare with the Y position of other idle items to detect whether the draggable item is above or below each one.
The third variable is a constant number for the amount of gap we have between each item. It’s the same value we defined in the CSS for .list:
.list {
  /* ... */
  gap: 10px 0;
}
For simplicity, I’m using a hardcoded value, but this can be improved by calculating the gap dynamically. This way, we won’t have to update it if we modify the CSS value—and that’s what I’ve actually done in the final code on GitHub.
Now let’s move to the update state part.
// Update state
getIdleItems().forEach((item) => {
  const itemRect = item.getBoundingClientRect()
  const itemY = itemRect.top + itemRect.height / 2

  if (isItemAbove(item)) {
    if (draggableItemY <= itemY) {
      item.dataset.isToggled = ''
    } else {
      delete item.dataset.isToggled
    }
  } else {
    if (draggableItemY >= itemY) {
      item.dataset.isToggled = ''
    } else {
      delete item.dataset.isToggled
    }
  }
})
To update the toggled state on each idle item, I looped through all idle items and calculated each item’s Y position—which is what we will use to compare with the draggable item’s Y position.
After that, we have two main checks: one for the items above the draggable item and one for the items below it.
// For items above the draggable item
if (isItemAbove(item)) {
  // ...
} else {
  // For items below the draggable item
  // ...
}
For the items above the draggable item, I enable the toggled state only if the draggable Item is currently being dragged above the idle item in the loop. If it’s being dragged below it, then I remove the toggled state. Here’s the code for that:
if (isItemAbove(item)) {
  if (draggableItemY <= itemY) {
    item.dataset.isToggled = ''
  } else {
    delete item.dataset.isToggled
  }
} else {
  //...
}
For the items below the draggable item, I do the opposite:
if (isItemAbove(item)) {
  // ...
} else {
  if (draggableItemY >= itemY) {
    item.dataset.isToggled = ''
  } else {
    delete item.dataset.isToggled
  }
}
After updating the state of each idle item, I need to adjust its position based on the updated state.
Once again, we loop through all idle items and check if each one is toggled or not. Based on that value, we determine how to move that item.
// Update position
getIdleItems().forEach((item) => {
  if (isItemToggled(item)) {
    const direction = isItemAbove(item) ? 1 : -1
    item.style.transform = `translateY(${
      direction * (draggableItemRect.height + itemsGap)
    }px)`
  } else {
    item.style.transform = ''
  }
})
If the item is toggled, we need to change the current position of the item. We determine the direction to move based on its data-is-above state. If the item was initially above the draggable item, then move it down; otherwise, move it up.
Setting the direction can be done by using the correct sign: positive to move down and negative to move it up.
const direction = isItemAbove(item) ? 1 : -1
After that, we update its translate position using the direction, the item’s height, and the item’s gap.
We can get the item’s height from any item since they all have the same height. In this example, I used the height of the draggable item, as I already have access to its rect.
item.style.transform = `translateY(${
  direction * (draggableItemRect.height + itemsGap)
}px)`
The else branch is for items that are not toggled. In this case we want to move it back to its original position, and we can do that by unsetting its transform CSS value.
item.style.transform = ''
Why did I use transform to move items?
I’ve already answered this earlier: with transform, we can update the item’s position relative to its initial position, which we needed for the mouse offset position.
But that’s not the only reason. Performance is another big reason I used transform instead of the top and left CSS properties, for example.
Optimizing rendering performance is a big topic that requires its own set of articles.
But to put it simply, using transform doesn’t require all rendering stages to render an element in the browser. The transform property just updates the element without repainting and updating the layout of anything on the page, making it much faster than other properties.
Using transform alone won’t achieve this behavior; we also need to promote the element to another layer on the page. We can do that using will-change: transform, which we added in the CSS for .list__item:
.list__item {
  /* ... */
  will-change: transform;
}
How to update an element’s position in the DOM?
Before showing you how to update the order of elements when the drag ends, let me show you how updating the position of an element works in general. By position, I mean the placement of an element in the DOM.
Let’s say you have this HTML:
<div class="list">
  <div class="item-1">Item 1</div>
  <div class="item-2">Item 2</div>
  <div class="item-3">Item 3</div>
</div>
To move an element to another position, you just need to add it to the DOM using one of the appending methods, such as appendChild and insertBefore.
When you use these methods on an element that is already in the DOM, they function as a move operation rather than an add operation.
So, if I want to move item-1 after item-3 in the example above, I will do this:
const list = document.querySelector('.list')
const item1 = document.querySelector('.item-1')

list.appendChild(item1)
After this, the result will be:
<div class="list">
  <div class="item-2">Item 2</div>
  <div class="item-3">Item 3</div>
  <div class="item-1">Item 1</div>
</div>
With that in mind, let’s go back to our example and see where to apply this.
Applying the new order on dragEnd
Based on what I explained in the previous section, we can save the new order in two steps:
- Create a new array with the items added in the new order.
- Loop through that array and append each one to the list using
appendChild—remember, this will update the position, not duplicate them.
The tricky part here is to know the new position of each item in the new array. But with the help of the isToggled and isAbove states, we can know that.
Here’s how it will work:
- Create a new empty array.
- Loop through all items (including the draggable item).
- If the item is the draggable item, skip this iteration (you will see why in a bit).
- If the item is not toggled, then add it to the same index in the new array.
- If the item is toggled, then calculate its new index based on the isAbove state. If the item was initially above the draggable item, then increase its index by 1; otherwise, decrease by 1.
Here’s how this part will be in code:
const reorderedItems = []

getAllItems().forEach((item, index) => {
  if (item === draggableItem) {
    return
  }
  if (!isItemToggled(item)) {
    reorderedItems[index] = item
    return
  }
  const newIndex = isItemAbove(item) ? index + 1 : index - 1
  reorderedItems[newIndex] = item
})
At this point, reorderedItems contains the new order of the items with an empty slot in the array. This empty slot is for the draggable item.
Let’s take an example to understand it better.
Let’s say that the original items array is:
const items = [item1, item2, item3, item4]
If you move item2 after item3, the result array after running the code above will be:
const reorderedItems = [item1, item3, undefined, item4]
So, now we know that there’s an undefined slot in the array that we need fill with the draggable item, but we don’t know its.
To know the index of that slot, we need to loop through all the items in the new array and check if it’s undefined. If it is undefined, then assign that slot with the draggable item.
for (let index = 0; index < getAllItems().length; index++) {
  const item = reorderedItems[index]
  if (typeof item === 'undefined') {
    reorderedItems[index] = draggableItem
  }
}
Lastly, we need to update the elements position with appendChild.
reorderedItems.forEach((item) => {
  listContainer.appendChild(item)
})
Putting it all together, we will have this code in a new function called applyNewItemsOrder:
function applyNewItemsOrder() {
  const reorderedItems = []

  getAllItems().forEach((item, index) => {
    if (item === draggableItem) {
      return
    }
    if (!isItemToggled(item)) {
      reorderedItems[index] = item
      return
    }
    const newIndex = isItemAbove(item) ? index + 1 : index - 1
    reorderedItems[newIndex] = item
  })

  for (let index = 0; index < getAllItems().length; index++) {
    const item = reorderedItems[index]
    if (typeof item === 'undefined') {
      reorderedItems[index] = draggableItem
    }
  }

  reorderedItems.forEach((item) => {
    listContainer.appendChild(item)
  })
}
We need to call it in dragEnd(), like this:
function dragEnd() {
  if (!draggableItem) return

  applyNewItemsOrder()
  cleanup()
}
After applying the new order, some of the idle items would still have their transform modified from updateIdleItemsStateAndPosition(). But to make it work properly, we need to reset their position after applying the new order.
Let’s do that in a new function called unsetItemState.
function unsetItemState() {
  getIdleItems().forEach((item, i) => {
    delete item.dataset.isAbove
    delete item.dataset.isToggled
    item.style.transform = ''
  })
}
In this function, we are not only resetting the items’ transform styling but also removing all their states.
Next, let’s call this function in cleanup().
function cleanup() {
  unsetDraggableItem()
  unsetItemState()

  document.removeEventListener('mousemove', drag)
}
Resetting the cached items array
Reordering items should work as expected the first time you try it, but after that, it will stop working correctly. The reason for that is because, after the first time, the items array is not cleared for subsequent times, which means it will still be using the old order of items.
We can fix that by simply clearing the array in cleanup().
function cleanup() {
  items = []
  unsetDraggableItem()
  unsetItemState()

  document.removeEventListener('mousemove', drag)
}
Supporting touch screens
If you try this widget on your phone, it won’t work. It’s because we haven’t handled touch screens yet. Let’s do this now.
For each mouse event listener, we need to add the equivalent one for touch screens.
They are: touchstart for mousedown, touchend for mouseup, and touchmove for mousemove.
Let’s add them. For touchstart and touchend, update setup().
function setup() {
  listContainer = document.querySelector('.js-list')

  if (!listContainer) return

  listContainer.addEventListener('mousedown', dragStart)
  listContainer.addEventListener('touchstart', dragStart)

  document.addEventListener('mouseup', dragEnd)
  document.addEventListener('touchend', dragEnd)
}
For touchmove, update dragStart() and cleanup().
function dragStart(e) {
  if (e.target.classList.contains('js-drag-handle')) {
    draggableItem = e.target.closest('.js-item')
  }

  if (!draggableItem) return

  pointerStartX = e.clientX || e.touches[0].clientX
  pointerStartY = e.clientY || e.touches[0].clientY

  initDraggableItem()
  initItemsState()

  document.addEventListener('mousemove', drag)
  document.addEventListener('touchmove', drag, { passive: false })
}
function cleanup() {
  items = []
  unsetDraggableItem()
  unsetItemState()

  document.removeEventListener('mousemove', drag)
  document.removeEventListener('touchmove', drag)
}
Notice how I updated pointerStartX and pointerStartY to this:
pointerStartX = e.clientX || e.touches[0].clientX
pointerStartY = e.clientY || e.touches[0].clientY
I needed to add this because the touch event object doesn’t contain clientX and clientY directly on the object. I need to access it through its first touch object.
This means we also need to update the drag() function to use the correct clientX and clientY.
function drag(e) {
  if (!draggableItem) return

  const currentPositionX = e.clientX || e.touches[0].clientX
  const currentPositionY = e.clientY || e.touches[0].clientY

  const pointerOffsetX = currentPositionX - pointerStartX
  const pointerOffsetY = currentPositionY - pointerStartY

  draggableItem.style.transform = `translate(${pointerOffsetX}px, ${pointerOffsetY}px)`

  updateIdleItemsStateAndPosition()
}
Now if you test it on your phone, it should work as expected.
Disable page scroll while dragging
Keeping the page scrollable while dragging can be very annoying, especially on touch screens. So let’s make it more user-friendly by disabling page scroll while dragging.
We should disable page scroll when the drag starts and re-enable it when the drag ends. This means, we need to disable it in dragStart() and enable it in dragEnd().
Let’s define the disable and enable functions first.
function disablePageScroll() {
  document.body.style.overflow = 'hidden'
  document.body.style.touchAction = 'none'
  document.body.style.userSelect = 'none'
}

function enablePageScroll() {
  document.body.style.overflow = ''
  document.body.style.touchAction = ''
  document.body.style.userSelect = ''
}
To disable page scroll, I needed to set overflow to hidden and touchAction to none on the body element. To further improve the user experience, I disabled text selection while dragging by setting userSelect to none.
To enable page scroll again, I simply unset all three properties like shown in the code above.
Next, update dragStart() and cleanup() to use those functions.
function dragStart(e) {
  if (e.target.classList.contains('js-drag-handle')) {
    draggableItem = e.target.closest('.js-item')
  }

  if (!draggableItem) return

  pointerStartX = e.clientX || e.touches[0].clientX
  pointerStartY = e.clientY || e.touches[0].clientY

  disablePageScroll()
  initDraggableItem()
  initItemsState()

  document.addEventListener('mousemove', drag)
  document.addEventListener('touchmove', drag, { passive: false })
}
function cleanup() {
  items = []
  unsetDraggableItem()
  unsetItemState()
  enablePageScroll()

  document.removeEventListener('mousemove', drag)
  document.removeEventListener('touchmove', drag)
}
Lastly, to make it work properly on the iPhone, we need to call e.preventDefault() in drag().
function drag(e) {
  if (!draggableItem) return

  e.preventDefault()

  const currentPositionX = e.clientX || e.touches[0].clientX
  const currentPositionY = e.clientY || e.touches[0].clientY

  const pointerOffsetX = currentPositionX - pointerStartX
  const pointerOffsetY = currentPositionY - pointerStartY

  draggableItem.style.transform = `translate(${pointerOffsetX}px, ${pointerOffsetY}px)`

  updateIdleItemsStateAndPosition()
}
Now it’s your turn to create seamless UIs
The goal of this article was to show the process of creating seamless UIs. I chose this example because it may seem challenging at first, but once you understand how each piece of the puzzle works, it becomes clearer to implement.
If there are some pieces that you didn’t fully understand in this article, I encourage you to back to them and try to understand them by experimenting in the browser. That’s the best way to learn.
Another good way to learn is to look for challenging UI designs and try to implement them yourself. Another option is to take a UI example and try to improve it, making it more seamless.