So you’ve learned SolidJS and built a bunch of demos, but you haven’t created a real-world application with it yet.
If that’s you, and you want to learn how to use the SolidStart framework to build a server-side rendered application that’s connected to a GraphQL server to load and store data, then this tutorial is for you.
In this tutorial, you’ll learn how to create a new project, add pages, implement authentication, connect to a GraphQL server, and style with TailwindCSS.
Prerequisites
In this tutorial I assume that you know the basics of SolidJS and you’ve at least skimmed through the SolidStart docs.
If you haven’t used SolidJS before, I encourage you to check the official tutorial first, and then continue here.
What are we going to build?
To focus on the concepts and the workflow of building a SolidStart app, we’ll build a simple Todo app.
The app will have three pages: login page, signup page, and the homepage. The homepage will contain the list of todos the user has. The user should also be able to add new todos, toggle todos, and delete todos.
It’s a good idea to check the code on GitHub before you start the tutorial (but it’s optional).
The GraphQL server
I’ve already created the backend project for this app. So all you need to know is the url of the GraphQL server.
To use it, you have to run it first. So you need to clone the project from GitHub and run it locally.
Ok, that was a long introduction. If you’re ready, let’s get started.
Create the project
First, run this from the terminal:
mkdir todoapp-solid && cd todoapp-solid
pnpm create solid
You’ll see a list of starter templates. Choose with-tailwindcss.
? Which template do you want to use? › - Use arrow-keys. Return to submit.
    bare
    hackernews
    todomvc
    with-auth
    with-mdx
    with-prisma
    with-solid-styled
❯   with-tailwindcss
    with-vitest
    with-websocket
This app will use typescript and will be server-side rendered, so choose yes to both.
✔ Which template do you want to use? › with-tailwindcss
✔ Server Side Rendering? … yes
✔ Use TypeScript? … yes
Now run pnpm install to install the dependencies. And while we are at it, let’s install the other dependencies that we’ll use in the project.
pnpm install @urql/core cookie cookie-signature graphql graphql-tag
These dependencies are related to GraphQL and cookie parsing. I’ll show you where they are used later.
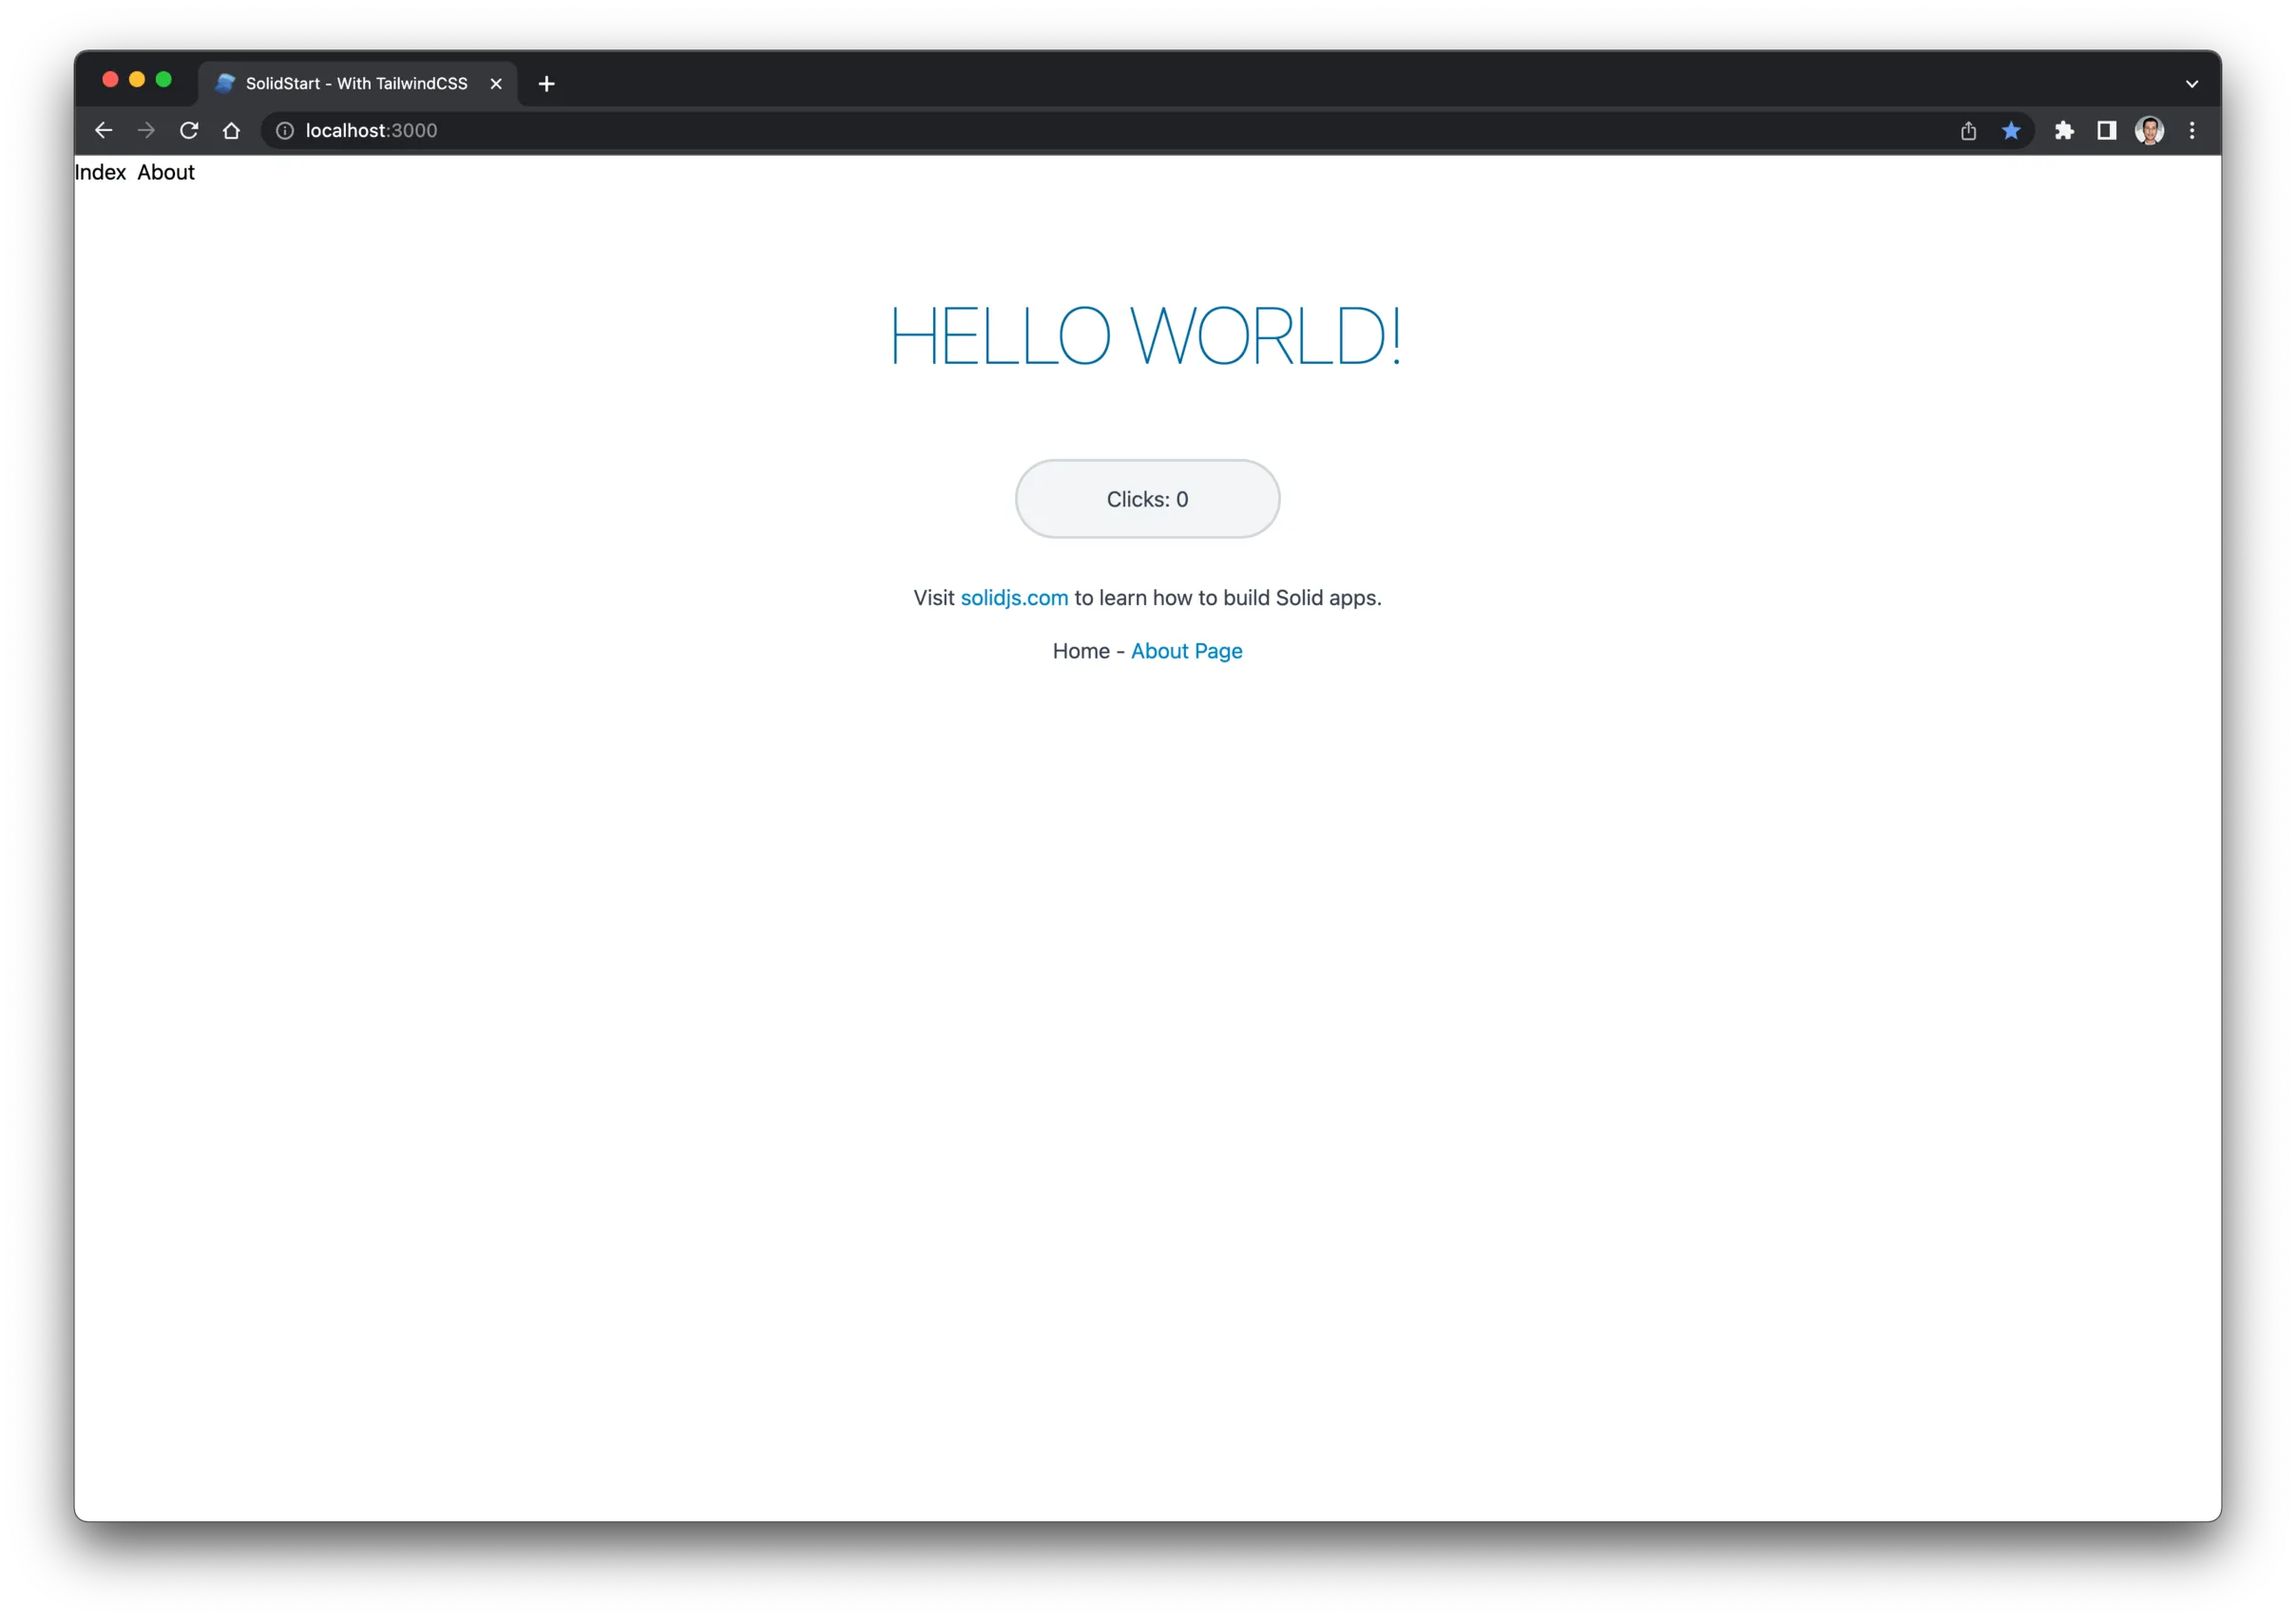
Before you continue, run the project by running pnpm run dev. If you open http://localhost:3000/, you should see this in your browser.
Style the body
Let’s change the default background color and text color to something else. We can do that from src/root.tsx.
Add the following classes to <Body>:
<body class="bg-gray-900 text-gray-100 antialiased font-roboto"></body>
Remove default nav bar links
The starter template comes with a list of nav links in the root component. We don’t need them for this project. So remove these from src/root.tsx.
<!-- REMOVE THESE -->
<a class="mr-2" href="/"> Index </a>
<a href="/about">About</a>
Remove unneeded files
For this project, we don’t need the about page or the counter component that comes with the starter template. So let’s remove src/routes/about.tsx and src/components/Counter.tsx.
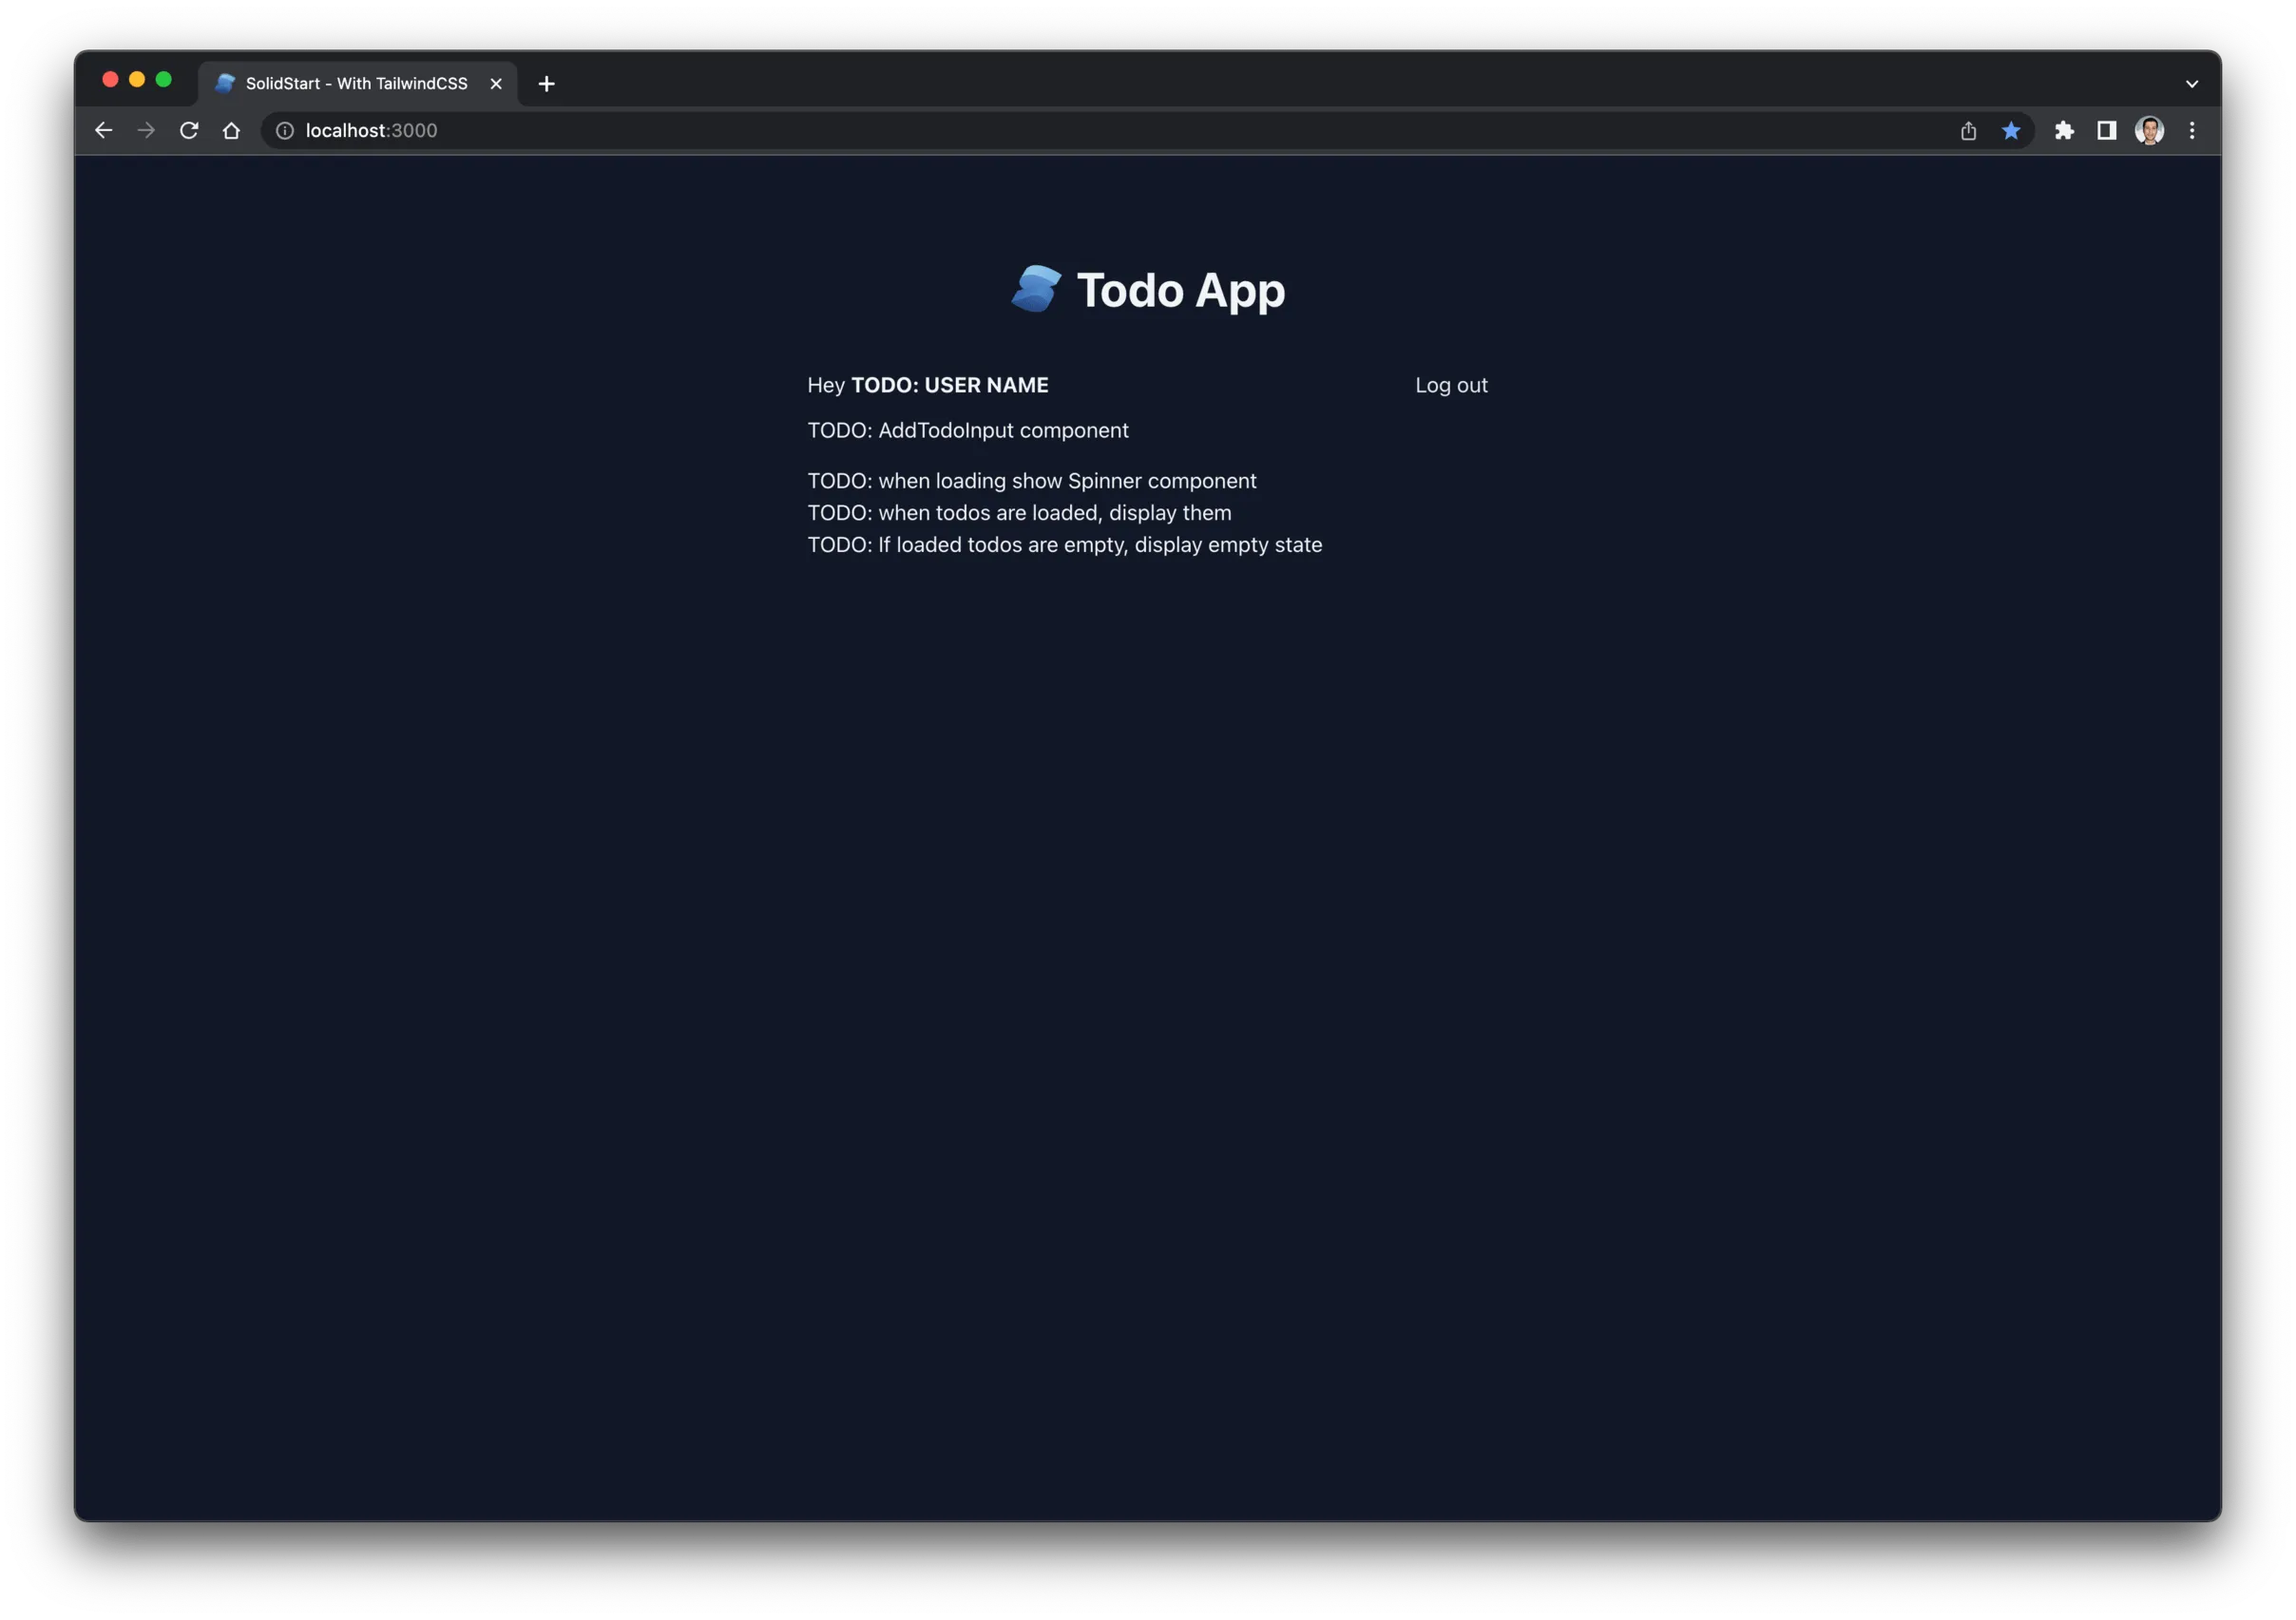
Add the initial markup to the homepage
Now let’s update our homepage (src/routes/index.tsx) to have the basic layout of our app.
import { Component } from 'solid-js'

const Home: Component = () => {
  return (
    <div class="mt-20 w-full max-w-lg mx-auto">
      <div>TODO: Header component</div>
      <div class="mt-10 flex items-center justify-between">
        <div>
          Hey <span class="font-bold">TODO: USER NAME</span>
        </div>
        <form>
          <button class="cursor-pointer text-gray-200 hover:text-white">
            Log out
          </button>
        </form>
      </div>
      <div class="mt-2.5">
        <div>TODO: AddTodoInput component</div>
        <div class="mt-3.5">
          <div>TODO: when loading show Spinner component</div>
          <div>TODO: when todos are loaded, display them </div>
          <div>TODO: If loaded todos are empty, display empty state</div>
        </div>
      </div>
    </div>
  )
}

export default Home
To know what components we will have in this page, I marked their places with TODO: .... This way it will be easier to show you where to add them when we create them later.
Create the header component
The header component is just a component that displays the name of the app and the SolidJS logo (as a nice touch 😁).
So, in src/components create Header.tsx and put the following into it.
import { Component } from 'solid-js'

const Logo = () => {
  return (
    <>
      {/* PASTE THE LOGO SVG HERE */}
      {/* https://www.solidjs.com/assets/logo.123b04bc.svg */}
    </>
  )
}

const Header: Component = () => {
  return (
    <h1 class="text-4xl font-bold text-center flex items-center justify-center">
      <div class="mr-2.5 w-10">
        <Logo />
      </div>
      Todo App
    </h1>
  )
}

export default Header
Now let’s use it on the homepage by replacing <div>TODO: Header component</div> with <Header />.
import { Component } from 'solid-js'
import Header from '~/components/Header'

const Home: Component = () => {
  return (
    <div class="mt-20 w-full max-w-lg mx-auto">
      <Header />
		{/* ... */}
If you check your browser now, you should see this:
Add the login page
Like the homepage, we’ll start by adding the HTML first with some TODO notes.
To add a new page in SolidStart, just add a new component to src/routes folder. Let’s name it login.tsx.
import { Component } from 'solid-js'
import Header from '~/components/Header'

const Login: Component = () => {
  return (
    <div class="min-h-screen flex flex-col justify-center items-center">
      <Header />
      <div>TODO: Show an error if username or password is incorrect</div>
      <form class="mt-5 w-full max-w-lg mx-auto flex flex-col">
        <input
          class="p-3.5 rounded-t border-b border-gray-300 text-gray-900 outline-none"
          name="username"
          type="text"
          placeholder="Username"
          required
        />
        <input
          class="p-3.5 rounded-b text-gray-900 outline-none"
          name="password"
          type="password"
          placeholder="Password"
          required
        />
        <button class="mt-2.5 py-2.5 rounded bg-blue-500 hover:bg-blue-600">
          Log in
        </button>
      </form>
      <div class="mt-5">
        Don't have an account?
        <a class="text-blue-400 ml-1" href="/signup">
          Sign up here
        </a>
      </div>
    </div>
  )
}

export default Login
If you go to the login page (http://localhost:3000/login), you should see this:
Add the signup page
It should be similar to the login page.
Create src/routes/signup.tsx and put the following:
import { Component } from 'solid-js'
import Header from '~/components/Header'

const Signup: Component = () => {
  return (
    <div class="min-h-screen flex flex-col justify-center items-center">
      <Header />
      <form class="mt-5 w-full max-w-lg mx-auto flex flex-col">
        <input
          class="p-3.5 rounded-t border-b border-gray-300 text-gray-900 outline-none"
          name="name"
          type="text"
          placeholder="Name"
          required
        />
        <input
          class="p-3.5 border-b border-gray-300 text-gray-900 outline-none"
          name="username"
          type="text"
          placeholder="Username"
          required
        />
        <input
          class="p-3.5 rounded-b text-gray-900 outline-none"
          name="password"
          type="password"
          placeholder="Password"
          required
        />
        <button class="mt-2.5 py-2.5 rounded bg-blue-500 hover:bg-blue-600">
          Sign up
        </button>
      </form>
      <div class="mt-5">
        Already have an account?
        <a class="text-blue-400 ml-1" href="/login">
          Log in here
        </a>
      </div>
    </div>
  )
}

export default Signup
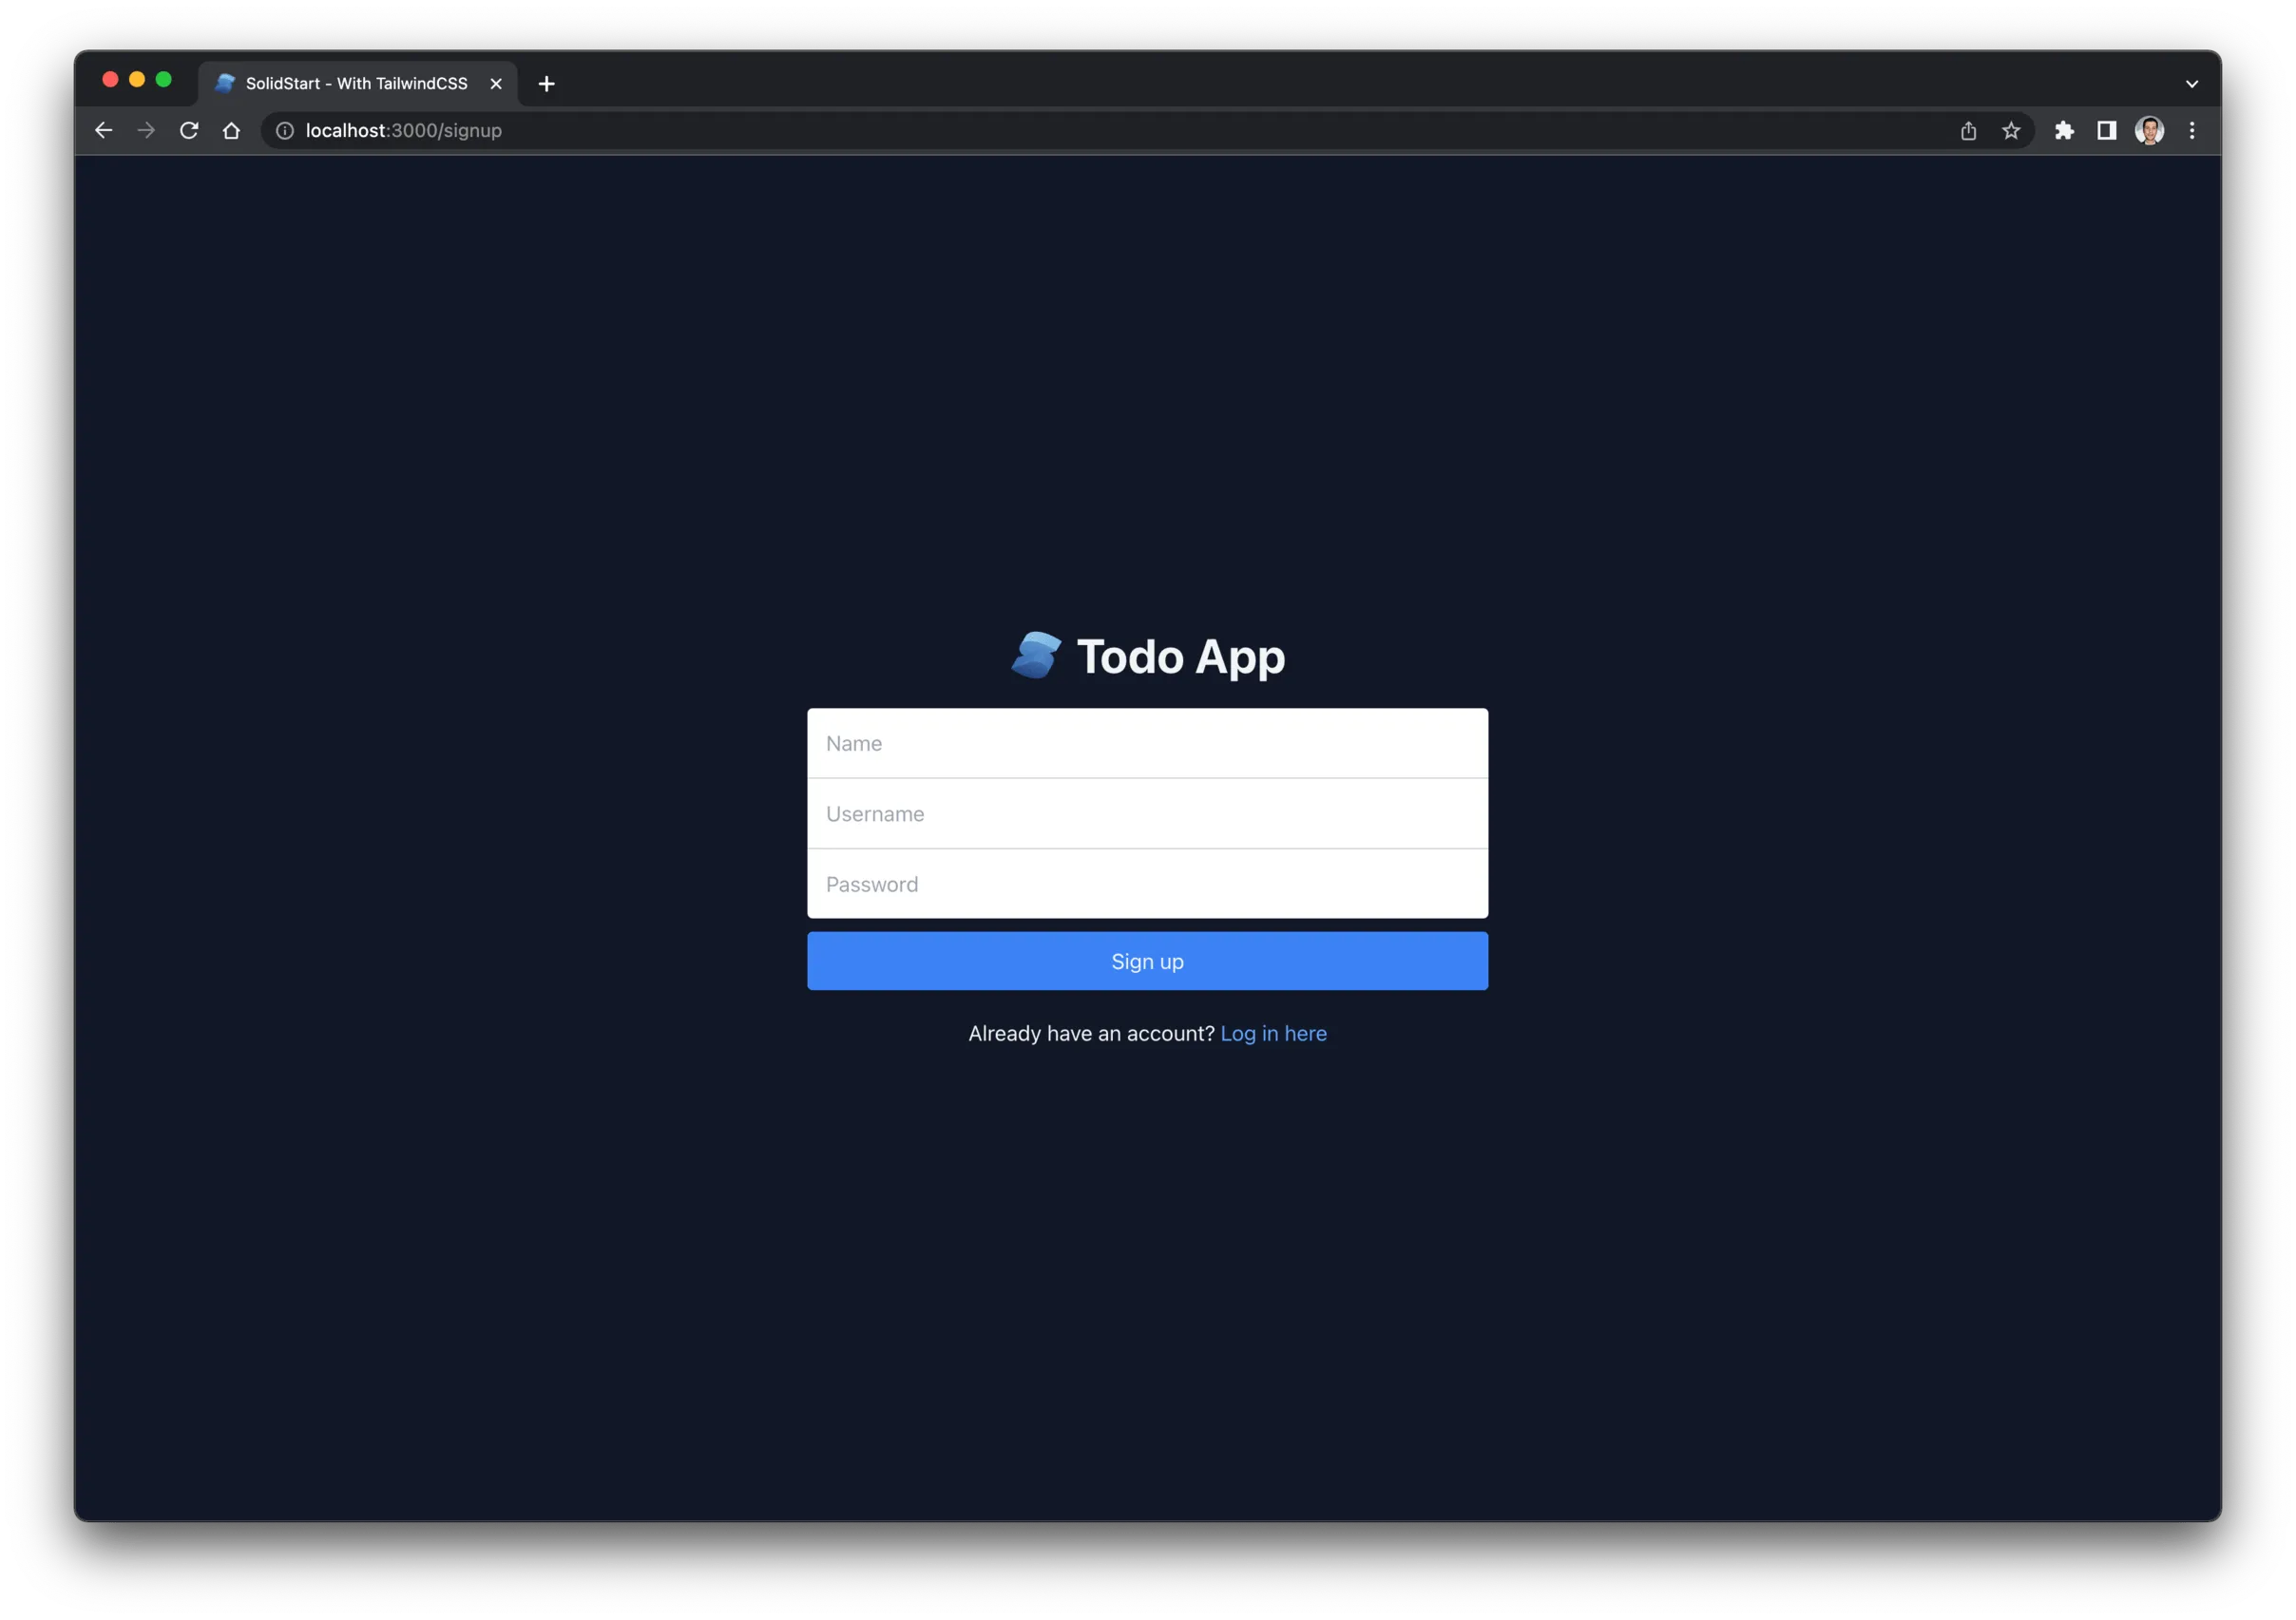
If you go to http://localhost:3000/signup, you should see this in your browser:
Use client-side routing with <A />
Right now, we are using the native <a></a> to link to other pages. It works fine, but when the user clicks it, it makes a full request (MPA-style) to go to the linked page.
We can improve that by switching it to the enhanced <A/> version to redirect to the page on the client (SPA-style). It makes the user experience faster and smoother.
All you have to do is just replace <a> with <A> after importing it with import { A } from 'solid-start'.
So, let’s update the login page and the signup page to use it.
Login:
<a class="text-blue-400 ml-1" href="/signup"> Sign up here </a>
Signup:
<a class="text-blue-400 ml-1" href="/login"> Log in here </a>
How are we going to implement authentication?
Authentication is a big topic that deserves a series of blog posts. But to keep things simple, I’ll explain how it works in this app in general, and then you can understand the details in the code on your own (which I encourage if you want to improve your development skills).
We will use JWT tokens for authentication. If you are not familiar with it, I recommend learning about it before continuing. (I wrote a blog post about here: Understand JWT in 3 minutes.)
Here’s a quick overview of how we are going to handle authentication in this app:
- The user logs in by providing their username and password
- We send the username and the password to our GraphQL server
- The GraphQL checks if they are valid (by comparing them to what’s stored in the database)
- Then, if they are valid, the GraphQL server generates a JWT token and returns it to our app in the response
- Then, we’ll be using this token by embedding it into the headers of every GraphQL query and mutation we send
Now this looks straightforward, but the complication comes when we want to store that token on the client side (so the user doesn’t have to login every time they close the app).
We need a place where both the server and the browser can access the token. The first thing comes to mind is cookies, which is correct. But storing it in regular cookies opens us to some security issues. The best way to avoid these issues is to store it in an http-only cookie – which is a cookie that can only be accessed from the server.
Now the question is: how can the browser access the token then?
Remember, we need the browser to access the token to send queries and mutations from the browser as well (i.e. AJAX requests).
The answer is by proxying the browser requests through our app’s API routes (which is run by our app’s server). So instead of sending the GraphQL request directly to the GraphQL server url, we send it through an internal endpoint on our server that can access the token from the cookie. Then it takes the token, put it on the request headers, and then forwards the request to the real GraphQL server.
The internal server endpoint can be easily created with SolidStart’s API Routes.
This is a brief explanation of how the authentication in this app will work. Since it’s beyond the scope of this tutorial to explain how the authentication code works, I’ll just show you how to add the authentication code and how to use it.
Add the GraphQL client
You can use any GraphQL client you want. For this project, I will use URQL.
We will be using the client in multiple places, so let’s add a module that we can import to get an instance of the client.
Let’s create it in a folder named lib inside src. So, create src/lib/urqlClient.ts and put the following into it (I will explain what it contains below).
import { createClient } from '@urql/core'
import { isServer } from 'solid-js/web'

let token = ''

export function setToken(newToken: string) {
  token = newToken
}

export const urqlClient = () => {
  return createClient({
    url: isServer ? import.meta.env.VITE_GRAPHQL_URL : '/api/graphql',
    fetchOptions: () => {
      return {
        headers: {
          authorization: token || ''
        }
      }
    }
  })
}
This module exports two functions: setToken and urqlClient.
In the beginning, when the app loads, the token will not be available to the client, but it might be stored in the cookie. So, we need a way to set it once it’s available – that’s what setToken is for.
urqlClient is used to get an instance of the GraphQL client. It might be used from the browser or the server. If it’s used in the server, then we need to set its url directly to the GraphQL server (because no need to use the proxy in the server since it has access to the http-only cookie).
Note how we are using import.meta.env.VITE_GRAPHQL_URL to get the url from environment variables, which we store in .env, which we’ll create in a bit.
If the GraphQL client is used from the browser, then we should set its url to the proxy endpoint, in this case it will be /api/graphql (you can name it whatever you want, but it has to match path of API route in routes folder).
Add .env
It’s always a good practice to store sensitive data as environment variables. So let’s create .env in the root directory and put this into it:
VITE_GRAPHQL_URL=http://localhost:4000/graphql
VITE_COOKIE_TOKEN_KEY=solid-todoapp-token
VITE_COOKIE_SECRET_KEY=secret
We can easily access them any where in the app with import.meta.env.YOUR_VAR_NAME.
Add the GraphQL proxy API route
Since we have used the /api/graphql as the proxy url, then we need to create the API route in src/routes/api/graphql.ts.
Here’s the code to put into it. You don’t need to understand how it works, but just know that it forwards any GraphQL request coming from the browser to the real GraphQL server url (after putting the JWT token to its headers).
import { APIEvent, json } from 'solid-start'
import cookieParser from 'cookie'
import cookieSign from 'cookie-signature'

async function parseBody(request: Request) {
  const reader = request.body.getReader()
  const stream = await new ReadableStream({
    start(controller) {
      return pump()
      function pump() {
        return reader.read().then(({ done, value }) => {
          if (done) {
            controller.close()
            return
          }
          controller.enqueue(value)
          return pump()
        })
      }
    }
  })
  return await (await new Response(stream)).json()
}

function getToken(request: Request) {
  const parsedCookies = cookieParser.parse(request.headers.get('Cookie'))
  const unsigned = cookieSign.unsign(
    parsedCookies[import.meta.env.VITE_COOKIE_TOKEN_KEY],
    import.meta.env.VITE_COOKIE_SECRET_KEY
  )
  const decoded = JSON.parse(Buffer.from(unsigned, 'base64').toString('utf8'))
  return decoded.token
}

const proxyGraphqlRequest = async (request: Request) => {
  const payload = await parseBody(request)
  const token = await getToken(request)

  try {
    const resposne = await fetch(import.meta.env.VITE_GRAPHQL_URL, {
      method: 'POST',
      mode: 'cors',
      headers: {
        ...request.headers,
        'content-type': 'application/json',
        authorization: token
      },
      body: JSON.stringify(payload)
    })
    const jsonResponse = await resposne.json()
    return json(jsonResponse)
  } catch (error) {
    console.log('error', error)
  }
}

export const POST = ({ request }: APIEvent) => {
  return proxyGraphqlRequest(request)
}
Add queries and mutations
The GraphQL server for this app provides us with a list of queries and mutations that we will use to login users, signup users, add todos, update todos, etc.
Let’s add them to our project under src/graphql/. All queries will go in src/graphql/queries.ts, and all mutations will go in src/graphql/mutations.ts.
Put the following into src/graphql/queries.ts:
import { gql } from 'graphql-tag'

export const CURRENT_USER = gql`
  query currentUser {
    currentUser {
      id
      username
      name
    }
  }
`

export const TODOS = gql`
  query todos {
    todos {
      id
      title
      completed
    }
  }
`
And this into src/graphql/mutations.ts:
import { gql } from 'graphql-tag'

export const SIGNUP_USER = gql`
  mutation signupUser($input: SignupUserInput!) {
    signupUser(input: $input) {
      status
    }
  }
`

export const LOGIN_USER = gql`
  mutation loginUser($username: String!, $password: String!) {
    loginUser(username: $username, password: $password) {
      token
    }
  }
`

export const UPDATE_TODO = gql`
  mutation updateTodo($input: UpdateTodoInput) {
    updateTodo(input: $input) {
      status
    }
  }
`

export const DELETE_TODO = gql`
  mutation deleteTodo($todoId: ID) {
    deleteTodo(todoId: $todoId) {
      status
    }
  }
`

export const ADD_TODO = gql`
  mutation addTodo($input: AddTodoInput!) {
    addTodo(input: $input) {
      id
      title
      completed
    }
  }
`
Actions in SolidStart
SolidStart gives us a neat way to handle form submissions. Form submissions can either be done on the browser side (AJAX) or on the server side.
What determines which one to use is the function you use to create the action. createServerAction$ for server submissions, and createRouteAction for browser submissions.
Calling either one returns an array of two values. The first one contains the status of the action (like if it’s pending, or if it has errors). The second value contains the function that runs the action.
To make this even better, we can access <Form /> off of the second value, which is an enhanced version of the form element. Using it will run the action once the form is submitted.
Integrate the signup form
To integrate the signup form, we need to create an action for the server to send a GraphQL mutation to create a new user. Then, we’ll replace the current <form> with the <Form /> component that we got from the action.
Here’s the full code of the signup page after the integration:
import { Component } from 'solid-js'
import { A } from 'solid-start'
import { createServerAction$, redirect } from 'solid-start/server'
import Header from '~/components/Header'
import { SIGNUP_USER } from '~/graphql/mutations'
import { urqlClient } from '~/lib/urqlclient'

const Signup: Component = () => {
  const [_, { Form }] = createServerAction$(async (form: FormData) => {
    const name = form.get('name')
    const username = form.get('username')
    const password = form.get('password')

    const result = await urqlClient()
      .mutation(SIGNUP_USER, { input: { name, username, password } })
      .toPromise()
    if (result) {
      return redirect('/login')
    }
  })

  return (
    <div class="min-h-screen flex flex-col justify-center items-center">
      <Header />
      <Form class="mt-5 w-full max-w-lg mx-auto flex flex-col">
        <input
          class="p-3.5 rounded-t border-b border-gray-300 text-gray-900 outline-none"
          name="name"
          type="text"
          placeholder="Name"
          required
        />
        <input
          class="p-3.5 border-b border-gray-300 text-gray-900 outline-none"
          name="username"
          type="text"
          placeholder="Username"
          required
        />
        <input
          class="p-3.5 rounded-b text-gray-900 outline-none"
          name="password"
          type="password"
          placeholder="Password"
          required
        />
        <button class="mt-2.5 py-2.5 rounded bg-blue-500 hover:bg-blue-600">
          Sign up
        </button>
      </Form>
      <div class="mt-5">
        Already have an account?
        <A class="text-blue-400 ml-1" href="/login">
          Log in here
        </A>
      </div>
    </div>
  )
}

export default Signup
Integrate the login form
Let me show you the code first and explain it below.
import { Component, Show } from 'solid-js'
import { A, FormError } from 'solid-start'
import { createServerAction$, redirect } from 'solid-start/server'
import Header from '~/components/Header'
import { login } from '~/session'

const Login: Component = () => {
  const [loggingIn, { Form }] = createServerAction$(async (form: FormData) => {
    const username = form.get('username')
    const password = form.get('password')

    if (typeof username !== 'string' || typeof password !== 'string') {
      throw new FormError('Form data are not correct')
    }

    const headers = await login({ username, password })
    if (headers) {
      return redirect('/', { headers })
    }
  })

  return (
    <div class="min-h-screen flex flex-col justify-center items-center">
      <Header />
      <Show when={loggingIn.error}>
        <div class="mb-3.5 px-3.5 py-2 rounded-lg bg-red-700 text-red-50 text-sm font-medium">
          Your username or password is incorrect
        </div>
      </Show>

      <Form class="mt-5 w-full max-w-lg mx-auto flex flex-col">
        <input
          class="p-3.5 rounded-t border-b border-gray-300 text-gray-900 outline-none"
          name="username"
          type="text"
          placeholder="Username"
          required
        />
        <input
          class="p-3.5 rounded-b text-gray-900 outline-none"
          name="password"
          type="password"
          placeholder="Password"
          required
        />
        <button class="mt-2.5 py-2.5 rounded bg-blue-500 hover:bg-blue-600">
          Log in
        </button>
      </Form>
      <div class="mt-5">
        Don't have an account?
        <A class="text-blue-400 ml-1" href="/signup">
          Sign up here
        </A>
      </div>
    </div>
  )
}

export default Login
We created a server action similar to the signup page, but the main difference here is that we are not using the GraphQL client here. Instead, we are calling a login() function from a file called session.ts, which we haven’t created yet.
The reason for that is because logging in involves more things that just sending a GraphQL request. For example, after the user is logged in, we need to store the token in the cookie.
We can also add other things related to authentication in session.ts, like getUser to get the current user data, and logout.
So to finish up the login page, create src/session.ts and put this into it.
import { createCookieSessionStorage, FormError, redirect } from 'solid-start'
import { LOGIN_USER } from './graphql/mutations'
import { CURRENT_USER } from './graphql/queries'
import { setToken, urqlClient } from './lib/urqlclient'

const storage = createCookieSessionStorage({
  cookie: {
    name: import.meta.env.VITE_COOKIE_TOKEN_KEY,
    secure: true,
    secrets: [import.meta.env.VITE_COOKIE_SECRET_KEY],
    sameSite: 'lax',
    path: '/',
    maxAge: 60 * 60 * 24 * 30,
    httpOnly: true
  }
})

interface LoginForm {
  username: string
  password: string
}

export const login = async ({ username, password }: LoginForm) => {
  const result = await urqlClient()
    .mutation(LOGIN_USER, { username, password })
    .toPromise()

  if (!result.data?.loginUser?.token) {
    throw new FormError('Wrong username or password')
  }

  const token = result.data.loginUser.token

  const session = await storage.getSession()
  session.set('token', token)
  return {
    'Set-Cookie': await storage.commitSession(session)
  }
}

export const getUser = async (request: Request) => {
  const session = await storage.getSession(request.headers.get('Cookie'))
  const token = session.get('token')
  if (!token) {
    return null
  }

  setToken(token)

  const result = await urqlClient().query(CURRENT_USER, {}).toPromise()

  if (!result.data?.currentUser) {
    return redirect('/login')
  }
  return result.data.currentUser
}

export const logout = async (request: Request) => {
  const session = await storage.getSession(request.headers.get('Cookie'))
  return redirect('/login', {
    headers: {
      'Set-Cookie': await storage.destroySession(session)
    }
  })
}
Add route guards
By route guards I mean preventing logged-in users from going to the login and the signup pages and preventing guest users from going to the homepage.
To do this, we need to fetch the user using getUser() from src/sessions.ts, and see if it returns the user data. If it doesn’t, then it means the user is not logged in.
To make redirection works, we need to fetch the user before the page is rendered, in other words, fetch the user on the server side.
We can easily do that using createServerData$ in routeData.
Let’s use this on the homepage so that it redirects the user to the login page if not logged in yet.
Add this at the top of src/routes/index.tsx above const Home: Component = () => {:
import { Component } from 'solid-js'
import { redirect } from 'solid-start'
import { createServerData$ } from 'solid-start/server'
import Header from '~/components/Header'
import { getUser } from '~/session'

export function routeData() {
  const user = createServerData$(async (_, { request }) => {
    const user = await getUser(request)

    if (!user) {
      throw redirect('/login')
    }
    return user
  })

  return { user }
}
You can now test that in your browser. Try to go to http://localhost:3000, and you should be redirected http://localhost:3000/login automatically.
Note that you should be logged out first, which you can do manually by clearing the cookies – we’ll implement the logout button later.
Now let’s add the login and the signup route guards.
The login route guard is similar to the homepage except we redirect to the homepage if the user is logged in.
Update src/routes/login.tsx:
import { Component, Show } from 'solid-js'
import { A, FormError, useRouteData } from 'solid-start'
import {
  createServerAction$,
  createServerData$,
  redirect
} from 'solid-start/server'
import Header from '~/components/Header'
import { getUser, login } from '~/session'

export function routeData() {
  return createServerData$(async (_, { request }) => {
    if (await getUser(request)) {
      throw redirect('/')
    }
    return {}
  })
}

const Login: Component = () => {
  const user = useRouteData<typeof routeData>()
  user()
  // ...
An important thing to note here is that we had to call user() at the beginning of the component. We need to do that because the route data doesn’t get fetched until we call it explicitly.
Let’s add the same thing to the signup page.
Update src/routes/signup.tsx:
import { Component } from 'solid-js'
import { A, useRouteData } from 'solid-start'
import {
  createServerAction$,
  createServerData$,
  redirect
} from 'solid-start/server'
import Header from '~/components/Header'
import { urqlClient } from '~/lib/urqlclient'
import { getUser } from '~/session'
import { SIGNUP_USER } from '../graphql/mutations'

export function routeData() {
  return createServerData$(async (_, { request }) => {
    if (await getUser(request)) {
      throw redirect('/')
    }
    return {}
  })
}

const Signup: Component = () => {
  const user = useRouteData<typeof routeData>()
  user()
  // ...
Integrate log out
We have a log out button on the homepage, but it doesn’t do anything yet. Let’s fix that by adding a server action that calls logout() from src/session.ts.
So, update src/index.tsx:
// ...
const Home: Component = () => {
  const [, { Form }] = createServerAction$((f: FormData, { request }) =>
    logout(request)
  )
  // ...
Also, update the form element to use <Form />.
Display the user name on the homepage
We are already fetching the user on the homepage, but we are not using it yet.
Get the user data from the route by adding this:
const Home: Component = () => {
  const { user } = useRouteData<typeof routeData>()
  // ...
And then display the user name in place of TODO: USER NAME:
<span class="font-bold">{user()?.name}</span>
Create the Spinner component
This is a simple SVG component we will use for showing a loading indicator.
Create src/components/Spinner.tsx.
export default function Spinner() {
  return (
    <div class="w-full">
      {/* By Sam Herbert (@sherb), for everyone. More @ http://goo.gl/7AJzbL */}
      <svg
        viewBox="0 0 38 38"
        xmlns="http://www.w3.org/2000/svg"
        stroke="currentColor"
      >
        <g fill="none" fill-rule="evenodd">
          <g transform="translate(1 1)" stroke-width="2">
            <circle stroke-opacity=".5" cx="18" cy="18" r="18" />
            <path d="M36 18c0-9.94-8.06-18-18-18">
              <animateTransform
                attributeName="transform"
                type="rotate"
                from="0 18 18"
                to="360 18 18"
                dur="1s"
                repeatCount="indefinite"
              />
            </path>
          </g>
        </g>
      </svg>
    </div>
  )
}
Create AddTodoInput component
This component will be used to display the todo input and create the todos with ADD_TODO mutation.
Create the component file at src/components/AddTodoInput.tsx, and add this into it:
import { Component, createEffect, Show } from 'solid-js'
import { createRouteAction } from 'solid-start'
import { urqlClient } from '~/lib/urqlclient'
import Spinner from './Spinner'
import { ADD_TODO } from '../graphql/mutations'

interface AddTodoInputProps {
  refetchTodos: () => void
}

const AddTodoInput: Component<AddTodoInputProps> = (
  props: AddTodoInputProps
) => {
  const [addingTodo, { Form }] = createRouteAction(async (form: FormData) => {
    return await urqlClient()
      .mutation(ADD_TODO, {
        input: {
          title: form.get('title')
        }
      })
      .toPromise()
  })

  createEffect(() => {
    if (addingTodo.result) {
      props.refetchTodos()
    }
  })

  let inputRef: HTMLInputElement

  return (
    <Form
      class="px-5 w-full bg-gray-100 rounded-lg outline-none text-gray-900 flex items-center justify-between"
      onSubmit={(e) => {
        if (!inputRef.value.trim()) e.preventDefault()
        setTimeout(() => (inputRef.value = ''))
      }}
    >
      <input
        class="rounded-lg py-3.5 flex-1 bg-gray-100 outline-none pr-2.5"
        name="title"
        type="text"
        placeholder="What needs to be done?"
        readonly={addingTodo.pending}
        ref={inputRef}
      />
      <Show when={addingTodo.pending}>
        <div class="text-blue-900 w-8">
          <Spinner />
        </div>
      </Show>
    </Form>
  )
}

export default AddTodoInput
Two things to note here.
First, we are sending the mutation with createRouteAction instead of createServerData$ because we want to send it from the browser (AJAX).
Second, we are accepting a prop called refetchTodos. It’s a function that will refetch todos after we add a new one. We will pass it from the homepage component (which we’ll get to in a bit).
Create TodoItem component
This component will be used to display each todo item in the list. It will also contain the code to toggle its completed status, and the code to delete itself.
Toggling the todo will be done using UPDATE_TODO mutation. And deleting it will be done using DELETE_TODO mutation.
This component accepts two props: todo, which will contain the todo data to display, and refetchTodos, which will refetch the todos when it’s toggled or deleted.
Here’s the full code for the TodoItem component (src/components/TodoItem.tsx):
import { Component, createEffect, Show } from 'solid-js'
import { createRouteAction } from 'solid-start'
import { urqlClient } from '~/lib/urqlclient'
import { DELETE_TODO, UPDATE_TODO } from '../graphql/mutations'

export interface Todo {
  id: string
  title: string
  completed: boolean
}

interface TodoProps {
  todo: {
    id: string
    title: string
    completed: boolean
  }
  refetchTodos: () => void
}

const TodoItem: Component<TodoProps> = (props: TodoProps) => {
  const [deletingTodo, deleteTodo] = createRouteAction(
    async (todoId: string) => {
      return await urqlClient()
        .mutation(DELETE_TODO, {
          todoId: todoId
        })
        .toPromise()
    }
  )

  const [togglingTodo, toggleTodo] = createRouteAction(
    async ({ todoId, completed }: { todoId: string; completed: boolean }) => {
      return await urqlClient()
        .mutation(UPDATE_TODO, {
          input: {
            todoId,
            completed
          }
        })
        .toPromise()
    }
  )

  createEffect(() => {
    if (deletingTodo.result || togglingTodo.result) {
      props.refetchTodos()
    }
  })

  return (
    <div class="group flex items-center justify-between bg-gray-200 rounded-lg px-5 py-3.5 text-gray-900">
      <div class="flex items-center">
        <button
          class={
            'hover:border-blue-500 border-2 w-5 h-5 rounded-full flex items-center justify-center text-white cursor-pointer ' +
            (props.todo.completed
              ? 'bg-blue-500 border-blue-500'
              : 'border-gray-500')
          }
          onClick={() =>
            toggleTodo({
              todoId: props.todo.id,
              completed: !props.todo.completed
            })
          }
        >
          <Show when={props.todo.completed}>
            <svg style="width: 15px; height: 15px" viewBox="0 0 24 24">
              <path
                fill="currentColor"
                d="M21,7L9,19L3.5,13.5L4.91,12.09L9,16.17L19.59,5.59L21,7Z"
              />
            </svg>
          </Show>
        </button>
        <span
          class={
            (props.todo.completed ? 'line-through text-gray-500' : '') +
            ' ml-2.5'
          }
        >
          {props.todo.title}
        </span>
      </div>

      <button
        class="opacity-0 group-hover:opacity-100 text-gray-500 hover:text-gray-900"
        onClick={() => deleteTodo(props.todo.id)}
      >
        <svg style="width: 24px; height: 24px" viewBox="0 0 24 24">
          <path
            fill="currentColor"
            d="M9,3V4H4V6H5V19A2,2 0 0,0 7,21H17A2,2 0 0,0 19,19V6H20V4H15V3H9M9,8H11V17H9V8M13,8H15V17H13V8Z"
          />
        </svg>
      </button>
    </div>
  )
}

export default TodoItem
Fetch todos
Let’s update routeData in src/routes/index.tsx to fetch the todos along with the user.
import { Component, createResource } from 'solid-js'
import { redirect, useRouteData } from 'solid-start'
import { createServerAction$, createServerData$ } from 'solid-start/server'
import Header from '~/components/Header'
import { Todo } from '~/components/TodoItem'
import { TODOS } from '~/graphql/queries'
import { urqlClient } from '~/lib/urqlclient'
import { getUser, logout } from '~/session'

export function routeData() {
  const user = createServerData$(async (_, { request }) => {
    const user = await getUser(request)

    if (!user) {
      throw redirect('/login')
    }
    return user
  })

  const [todos, { refetch }] = createResource<Todo[]>(async () => {
    const { data } = await urqlClient().query(TODOS, {}).toPromise()
    return data.todos
  })

  return { user, todos, refetchTodos: refetch }
}
Note how we are also returning refetchTodos from it.
Next, let’s update the component to use the new fields.
const Home: Component = () => {
  const { user, todos, refetchTodos } = useRouteData<typeof routeData>()
  todos()
	// ...
Display AddTodoInput component
Our next step is to use <AddTodoInput /> component, which we’ve already created.
Import it, and replace <div>TODO: AddTodoInput component</div> with:
<AddTodoInput refetchTodos={refetchTodos} />
Adding new todos should work, but you wouldn’t see what’s added because we haven’t displayed the todos yet. This is for the next step.
Display todos
Displaying todos has three states: loading todos, showing an empty state when the todo list is empty, or displaying the todo items.
To display the loading indicator, replace <div>TODO: when loading show Spinner component</div> with:
<Show when={todos.loading}>
  <div class="mt-10 flex items-center justify-center text-xl font-medium">
    <div class="w-5 mr-2.5">
      <Spinner />
    </div>
    Loading Todos
  </div>
</Show>
When we have todos for the user, display them with <TodoItem /> component. So, replace <div>TODO: when todos are loaded, display them </div> with:
<Show when={!todos.loading && todos() && todos().length > 0}>
  <div class="space-y-2.5">
    <For each={todos()}>
      {(todo: Todo) => <TodoItem todo={todo} refetchTodos={refetchTodos} />}
    </For>
  </div>
</Show>
For the empty state, replace <div>TODO: If loaded todos are empty, display empty state</div> with:
<Show when={!todos.loading && !todos().length}>
  <div class="mt-10 text-center text-blue-50 text-opacity-40">
    Your Todo List is Empty
  </div>
</Show>
The app is ready
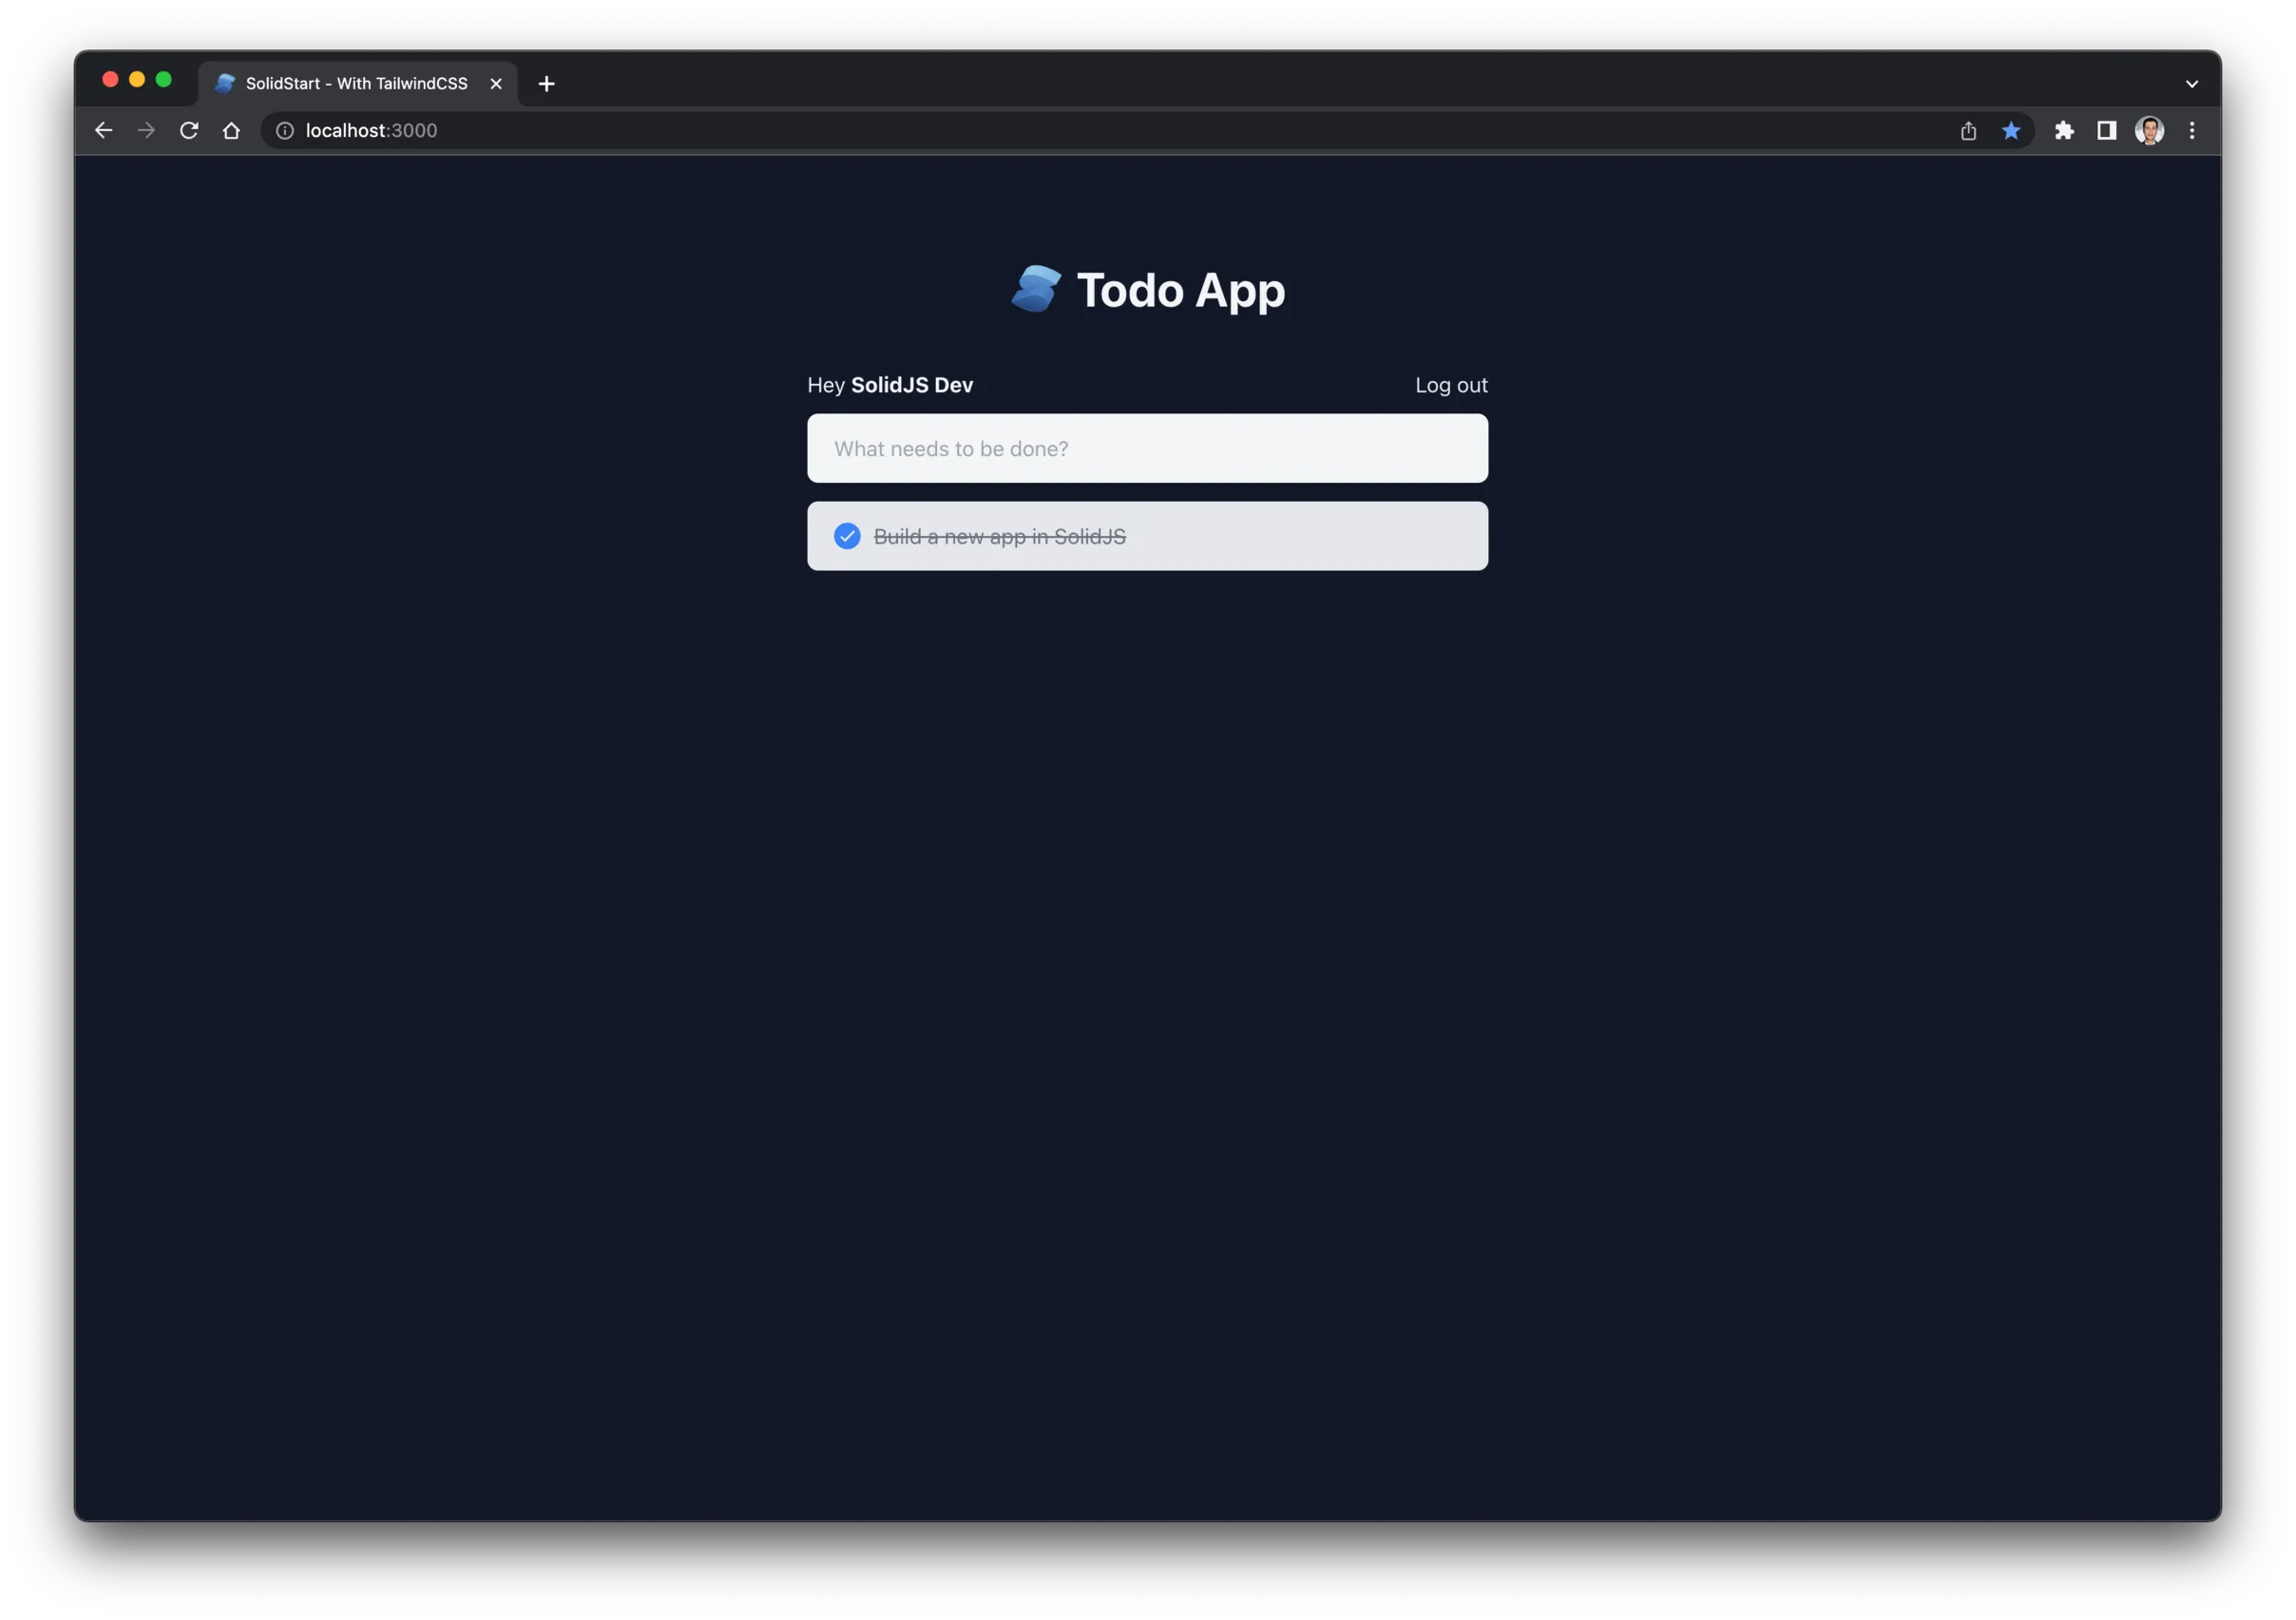
🎉 Congratulations! You’ve created a fully functioning app with SolidJS and SolidStart.
You should be able to sign up a new user, log in to the app, log out from the app, add todos, toggle todos, and delete todos.