Creating a Twitter-Like Header Transition on Scroll
Implementing something similar to the header transition on Twitter's profile page may seem challenging at first, but it's not that complex when you break down the animation into parts.
In this article, I'll show you how to implement the same animation in JavaScript from scratch.
Before continuing, I recommend checking out the demo on CodePen to test it and view the full code.
Creating the page
To make the article easier to follow, I'm going to leave out the unnecessary details of the HTML and CSS code and include only the important parts. To see the full code, check out the demo.
Let's start with the HTML of the page.
<div class="app">
  <!-- Cover Image Begin -->
  <div class="cover-image">
    <div class="cover-image__overlay"></div>

    <div class="cover-image__text">
      <div class="cover-image__name">John Doe</div>
      <div class="cover-image__tweets">12K Tweets</div>
    </div>

    <img class="cover-image__image" />
  </div>
  <!-- Cover Image End -->

  <!-- Header Begin -->
  <div class="header">
    <img class="header__profile-image" />

    <div class="header__user">
      <h1 class="header__user-name">John Doe</h1>
      <span class="header__user-handle">@john</span>
    </div>

    <p class="header__bio"></p>
    <div class="header__general-info"></div>
    <div class="header__follow-info"></div>
  </div>
  <!-- Header End -->

  <!-- Display the tweets in this div -->
  <div class="content"></div>
</div>
And the CSS (I added some notes in the comments).
* {
  box-sizing: border-box;
}

body {
  display: flex;
  flex-direction: column;
  /* center the content of the page */
  align-items: center;
}

.app {
  max-width: 600px;
  width: 100%;
  min-height: 100vh;
  display: flex;
  flex-direction: column;
}

.cover-image {
  position: sticky;
  top: 0;
  z-index: 1;
  width: 100%;
  height: 200px;
  overflow: hidden;
}

.cover-image__image {
  width: 100%;
  height: 100%;
  object-fit: cover;
  z-index: 1;
}

.cover-image__overlay {
  z-index: 2;
  position: absolute;
  top: 0;
  left: 0;
  width: 100%;
  height: 100%;
  background: rgba(0, 0, 0, 0.5);
  backdrop-filter: blur(10px);
  -webkit-backdrop-filter: blur(10px);
  opacity: 0;
}

.cover-image__text {
  z-index: 3;
  position: absolute;
  top: 0;
  left: 0;
  width: 100%;
  height: 100%;
  display: flex;
  flex-direction: column;
  justify-content: flex-end;
  padding: 0 0 10px 16px;
  color: white;
  transform: translateY(80px);
  will-change: transform;
}

.header {
  /*
  Initially the header should have higher
  z-index than .cover-image, but after scroll
  it becomes smaller
  */
  z-index: 2;
}

.header__profile-image {
  transform: translateY(-50%);
  /*
  Setting transform-origin to left and bottom
  keeps the element fixed at the bottom
  while reducing its size on scroll
  */
  transform-origin: left bottom;
  width: 130px;
  height: 130px;
  border-radius: 50%;
}

.header__user {
  /*
    We are pushing it up by half the height of .header__profile-image
    because .header__profile-image was moved up with translateY
  */
  margin-top: -65px;
}
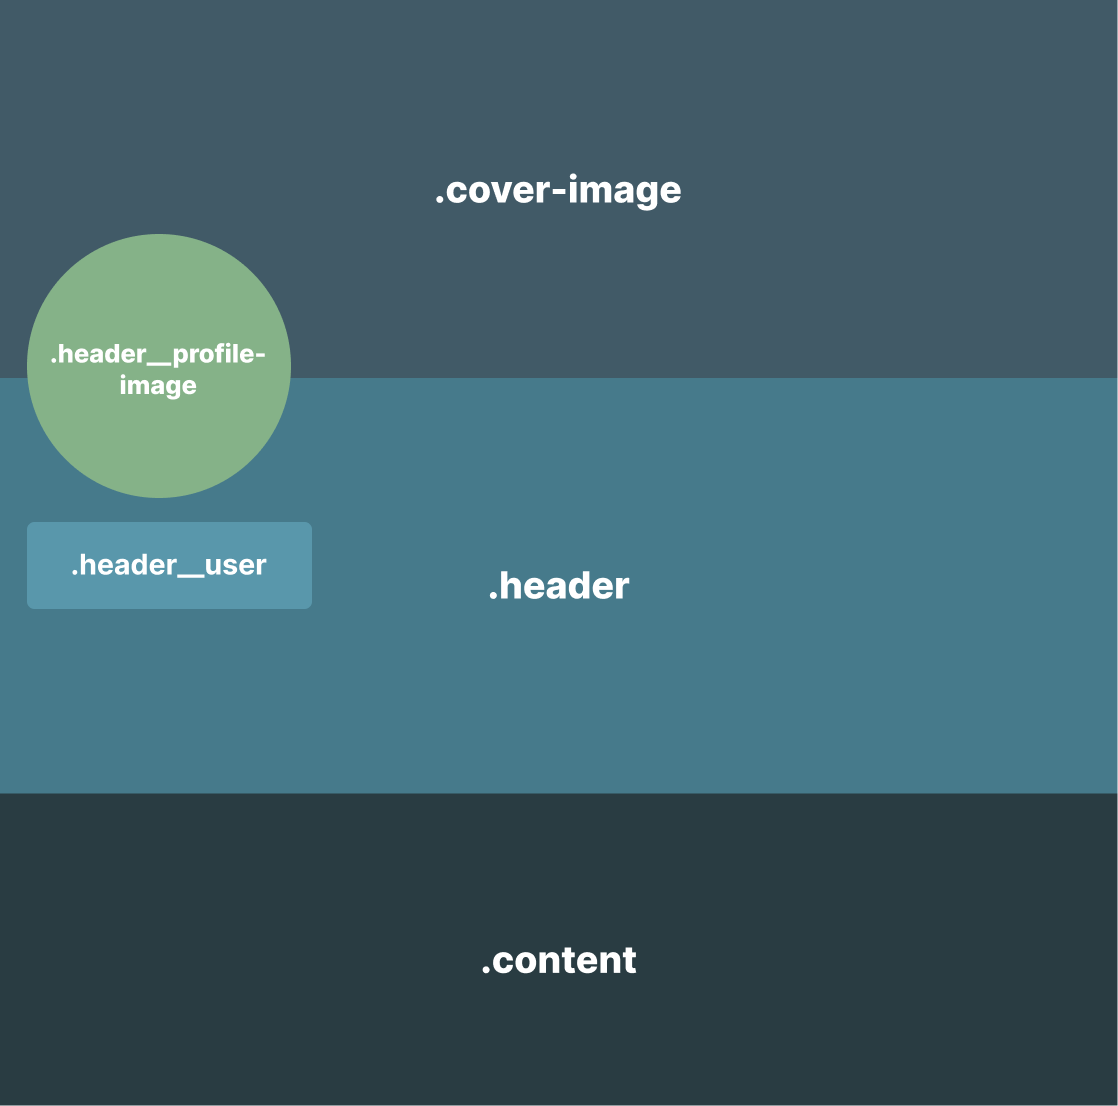
This page consists of three main parts:
.app: the container of the whole app..cover-image: the cover image section. Since it's a direct child of.appand a sticky element, it will remain sticky throughout the scrolling of the app..header: the section below the cover image and above the content section.
Here's a quick illustration of how the page is structured.
How to animate on scroll
To animate on scroll, you need to do three things:
- Set the starting and end points of the scroll area (let's call it the scroll range).
- Get the current percentage of where the element is in that scroll range.
- Use that percentage value to update the styling of the element.
The key here is the percentage value. This value ranges from 0 to 1. When it's 0, it means the element hasn't entered the scroll range. When it's 0.5, it means the element is in the middle of the scroll range. And when it's 1, it means the element has reached the end of the scroll range.
Let me give you a quick example of how to use that percentage value to update the styling of an element.
Let's say you have a box element that you want to scale from 0 to 2 along the scroll range. This means it will start from nothing and gradually double its size.
const percentage = 0.5
boxEl.style.transform = `scale(${percentage})`
In the above code, I'm showing an example of how the element will be at a certain point—it's halfway there in this example.
Using the percentage to style the element is easy, right? But how do we get that percentage value?
Instead of going into the details of how to do that manually, including all the edge cases, I created a simple package to help us with that. Meet Aat.
A quick introduction to Aat
I'll explain how to use it quickly here, but I encourage you to check out the docs before continuing to get a better understanding of it.
To install it, just run this from the terminal:
npm install aatjs
Or include it as a script tag:
<script src="https://unpkg.com/aatjs/dist/aat.min.js"></script>
To get the percentage value of the element in the scroll range, you need to attach an observer to it first.
import { ScrollObserver } from 'aatjs'

ScrollObserver.Element(boxEl).onScroll(({ percentageY }) => {
  console.log('The scroll percentage', percentageY)
}
In this example, I haven't specified the starting or the end points of the scroll range. This means it will use the defaults, which are the bottom of the viewport for the starting point and the top of the viewport for the end point.
Here's an example:
To specify the starting and end points, you can use offsetBottom for the starting point and offsetTop for the end point.
import { ScrollObserver } from 'aatjs'

const observer = ScrollObserver.Element(
  boxEl,
  { offsetBottom: 200, offsetTop: 100 }
)

observer.onScroll(({ percentageY }) => {
  console.log('The scroll percentage', percentageY)
}
- Using 200 in
offsetBottomwill push the starting point by 200px from the bottom. - Using 100 in
offsetTopwill push the end point by 100px from the top.
So applying this will make it work like this example:
Splitting the scroll animation into two parts
Let's get back to this article's example. Before showing you the code, let's break down this scroll animation into two parts.
The first part involves the cover image and the profile image shrinking in size. The second part consists of the cover image becoming blurry, and the extra text appears from the bottom.
The first part:
The second part:
With that in mind, we can simplify our scroll observer code by splitting it into two observers. In other words, we will have two different scroll ranges to animate within.
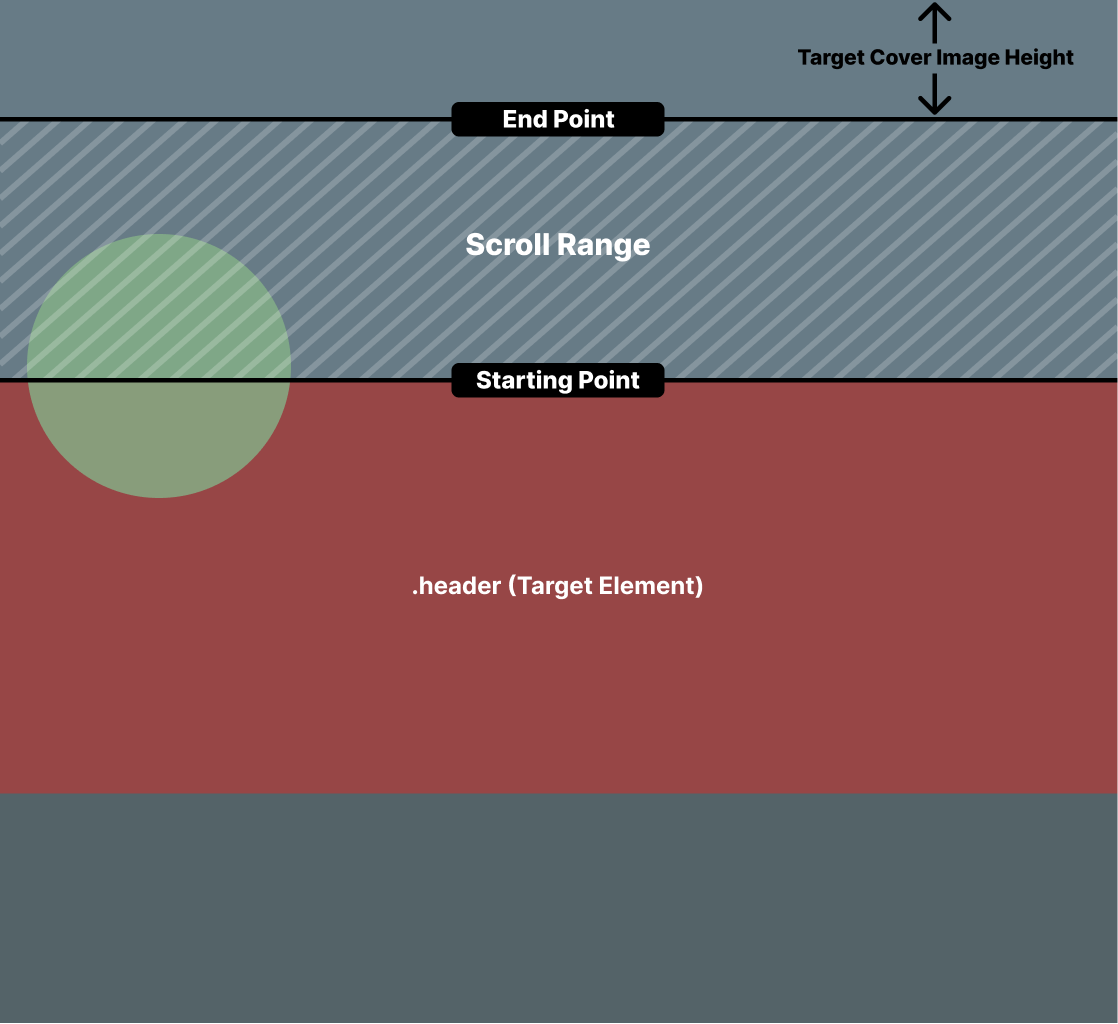
The first part
To implement a scroll animation, we need to specify the scroll range and the element we want to attach the scroll observer to.
Based on our app's layout, using the .header element as the scroll observer element makes the most sense since it's directly below the cover image.
The trickiest part here is specifying the scroll range.
The starting point should be obvious here. It should be placed directly above the header because we want to initiate the transition on the first scroll event.
To modify the starting point, we have to update the offsetBottom in the scroll observer configs. In this case, we should set it to viewportFullHeight - topPositionOfTheHeader.
In code we can write it like this:
const COVER_IMAGE_HEIGHT = 200

ScrollObserver.Element(header, {
  offsetBottom: () => window.innerHeight - COVER_IMAGE_HEIGHT
})
For simplicity, I'm just storing the height of the cover image in a constant.
The end point should be the point where we want the transition to end. In this case, it should be when the cover image reaches its final height (for this example it should be 60px).
const COVER_IMAGE_HEIGHT = 200
const TARGET_IMAGE_HEIGHT = 60

ScrollObserver.Element(header, {
  offsetBottom: () => window.innerHeight - COVER_IMAGE_HEIGHT,
  offsetTop: TARGET_IMAGE_HEIGHT
})
Do you see how I'm using a function for offsetBottom but a number for offsetTop? It's because offsetBottom contains window.innerHeight, which is a dynamic value that can change if the viewport was resized for some reason.
In the end, the scroll range would look something like this:
Here's the code for the first part of the animation:
import { ScrollObserver, valueAtPercentage } from 'aatjs'

const COVER_IMAGE_HEIGHT = 200
const TARGET_IMAGE_HEIGHT = 60

const header = document.querySelector('.header')
const coverImageContainer = document.querySelector('.cover-image')
const profileImage = document.querySelector('.header__profile-image')

ScrollObserver.Element(header, {
  offsetBottom: () => window.innerHeight - COVER_IMAGE_HEIGHT,
  offsetTop: TARGET_IMAGE_HEIGHT
}).onScroll(({ percentageY }) => {
  const translateY = valueAtPercentage({
    from: 0,
    to: -(COVER_IMAGE_HEIGHT - TARGET_IMAGE_HEIGHT),
    percentage: percentageY,
    unit: 'px'
  })

  const profileImageScale = valueAtPercentage({
    from: 1,
    to: 0.5,
    percentage: percentageY
  })

  coverImageContainer.style.transform = `translateY(${translateY})`
  profileImage.style.transform = `translateY(-50%) scale(${profileImageScale})`

  // Make the z-index of the cover image higher at the end
  // of the transition. This is needed to make
  // the profile image appear behind the cover image
  coverImageContainer.style.zIndex = percentageY >= 1 ? 10 : 1
})
Most of this should be familiar to you by now, except for valueAtPercentage.
It's a helper function to calculate the current transition value based on the current percentage. It's needed because not all values ranges from 0 to 1 (like the simple scale example earlier).
The second part
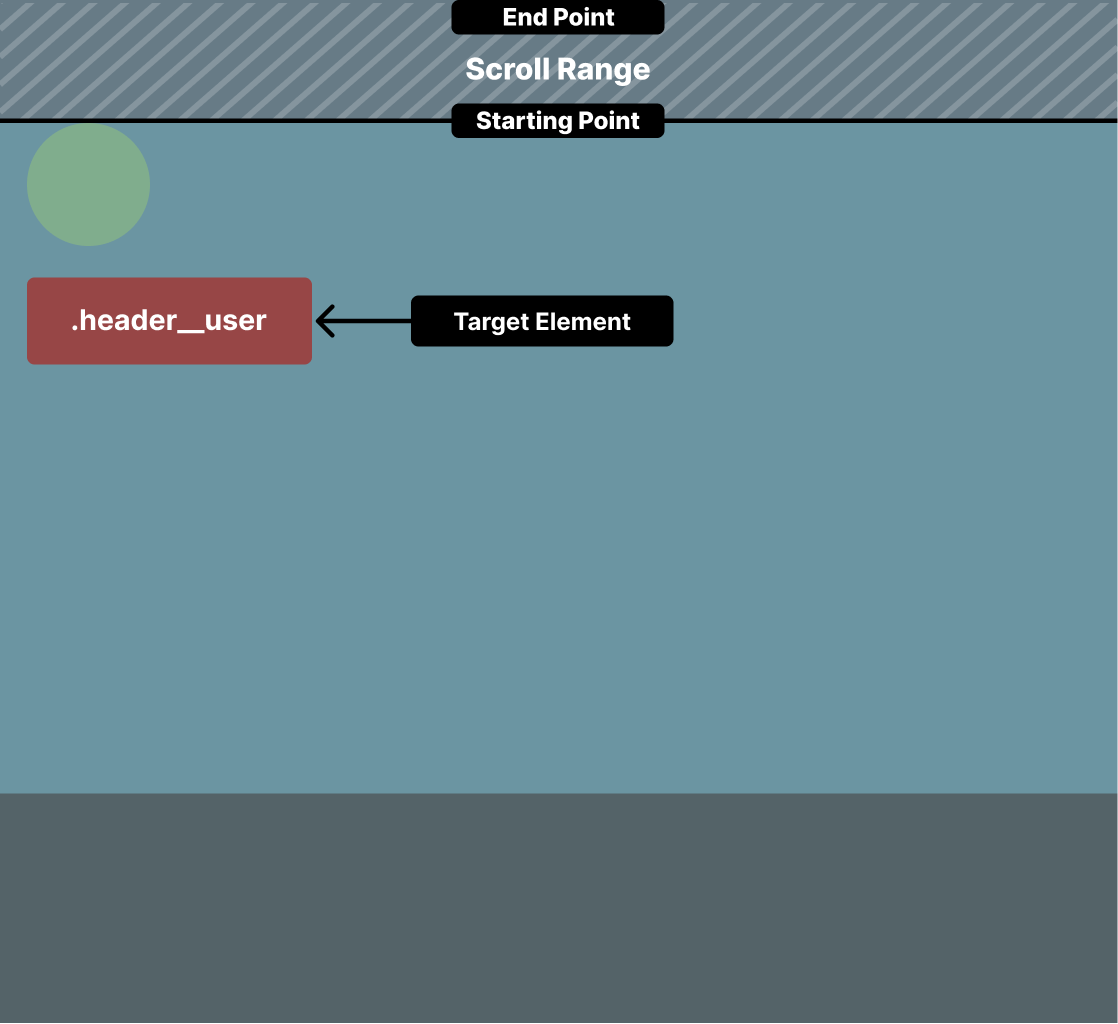
In the second part, we want to start the transition once the name of the user hits the bottom of the cover image (after its height was shrunk).
This means that the element we want to observe is the .header__user, and the starting point is viewportFullHeight - TARGET_IMAGE_HEIGHT. We can leave the end point as the default value 0 because we want it to be at the very top of the cover image height, which is the same as the top of the viewport.
Here's the code for this transition part:
const coverImageOverlay = document.querySelector('.cover-image__overlay')
const coverImageText = document.querySelector('.cover-image__text')
const headerUser = document.querySelector('.header__user')

ScrollObserver.Element(headerUser, {
  offsetBottom: () => window.innerHeight - TARGET_IMAGE_HEIGHT
}).onScroll(({ percentageY }) => {
  const translateY = valueAtPercentage({
    from: 42,
    to: 0,
    percentage: percentageY,
    unit: 'px'
  })
  coverImageOverlay.style.opacity = percentageY
  coverImageText.style.transform = `translateY(${translateY})`
})
For showing the overlay, I passed the percentage value directly since it start from 0 to 1, which is the same as the opacity range.
But for moving the text up, I had to experiment with a few values for translateY, and I found 42 works best.
The final JS code
After putting the two parts together, we will have this code.
import { ScrollObserver, valueAtPercentage } from 'aatjs'

const COVER_IMAGE_HEIGHT = 200
const TARGET_IMAGE_HEIGHT = 60

const header = document.querySelector('.header')
const coverImageContainer = document.querySelector('.cover-image')
const profileImage = document.querySelector('.header__profile-image')
const coverImageOverlay = document.querySelector('.cover-image__overlay')
const coverImageText = document.querySelector('.cover-image__text')
const headerUser = document.querySelector('.header__user')

ScrollObserver.Element(header, {
  offsetBottom: () => window.innerHeight - COVER_IMAGE_HEIGHT,
  offsetTop: TARGET_IMAGE_HEIGHT
}).onScroll(({ percentageY }) => {
  const translateY = valueAtPercentage({
    from: 0,
    to: -(COVER_IMAGE_HEIGHT - TARGET_IMAGE_HEIGHT),
    percentage: percentageY,
    unit: 'px'
  })
  const profileImageScale = valueAtPercentage({
    from: 1,
    to: 0.5,
    percentage: percentageY
  })
  coverImageContainer.style.transform = `translateY(${translateY})`
  profileImage.style.transform = `translateY(-50%) scale(${profileImageScale})`
  coverImageContainer.style.zIndex = percentageY >= 1 ? 10 : 1
})

ScrollObserver.Element(headerUser, {
  offsetBottom: () => window.innerHeight - TARGET_IMAGE_HEIGHT
}).onScroll(({ percentageY }) => {
  const translateY = valueAtPercentage({
    from: 42,
    to: 0,
    percentage: percentageY,
    unit: 'px'
  })
  coverImageOverlay.style.opacity = percentageY
  coverImageText.style.transform = `translateY(${translateY})`
})